Rust tool RTK trims agent terminal output to save tokens
Install the RTK hook in Claude Code, compare the same cargo test in two shapes, recover trimmed output, read the gain numbers and uninstall, step by step.
Say CI broke on a Friday afternoon and you asked a coding agent to “run the tests and find the cause” (a scene the editors made up). The agent runs cargo test and reads every line saying that 498 of 500 tests passed before it ever reaches the 2 that failed. The passing lines are useless for the diagnosis, yet they become input tokens, and that output is read again on later calls as part of the conversation history. RTK (Rust Token Killer) is a single executable that trims this output before the agent reads it. It is maintained by the GitHub organization rtk-ai; as of Oct 27, 2026 it has roughly 84,600 stars and 5,400 forks, and the latest stable release is v1.1.0 from Oct 25.
This article skips the product tour and follows the steps in order. You install it while avoiding a project that shares the name, register the hook, see how the cargo test from the scene above changes, pull up the original when the trimmed output is not enough, read the savings numbers, and finish by removing everything cleanly. The baseline is Claude Code; other agents are covered in a separate part midway.
Check the name before installing
Two projects use the name rtk: Rust Token Killer (rtk-ai/rtk), the subject of this article, and Rust Type Kit (reachingforthejack/rtk), which generates Rust types. The rtk on crates.io may point to the latter, so cargo install rtk can install the wrong tool. The official docs tell you to specify the Git URL when installing with Cargo.
There are five ways to install. The check steps below are the same whichever you pick.
# macOS / Linux (Homebrew tap, release binary)
brew install rtk-ai/tap/rtk
# Windows
winget install rtk-ai.rtk
# Cargo (always specify the Git URL)
cargo install --git https://github.com/rtk-ai/rtk --branch master rtk
The README also lists brew install rtk. That one is the source-build formula in the official Homebrew repository, while rtk-ai/tap/rtk in the install guide is the formula that downloads the release binary. The install script (curl … | sh) and prebuilt binaries are official methods too. The script runs whatever it downloads without you reading it, so it is safer to save it to a file, skim it, and then run it, or to use a package manager. If you build from source yourself, you need Rust 1.91 or later.
When the install finishes, two commands tell you whether you got the right project.
rtk --version
rtk gain
If rtk gain shows the savings dashboard, it is the right tool. If you get the error rtk: 'gain' is not a rtk command, you installed Rust Type Kit; remove it with cargo uninstall rtk and reinstall using the Git URL above. If you installed with Cargo and see command not found: rtk, the usual cause is that ~/.cargo/bin is not on your PATH.
See which files change before enabling the hook
Installing rtk does not shrink the agent’s output by itself. You have to register a hook that steps in right before the agent runs a tool. Registering means editing configuration files, so it is best to follow the order the docs set out, with --dry-run first.
- See what will change.
rtk init --global --dry-runlists the files it would create or edit as[dry-run] would …lines and writes nothing - Connect it.
rtk init --globalinstalls the global Claude Code hook and registers it in~/.claude/settings.json. An instruction file,RTK.md, is created along with it - Restart the agent. The hook applies from newly started sessions
- Confirm the registration. Run
rtk init --showto see whether the hook is registered, andgrep rtk ~/.claude/settings.jsonto check that the settings file has an entry too - Work as usual. After running a few commands, open
rtk gainandrtk gain --history
If you want it for a single project only, run rtk init without --global. In that case no hook is installed; a note goes into CLAUDE.md and a .rtk/filters.toml template is created. With only a note and no hook, the agent is merely asked to use rtk, so for the trimming to really take effect the global hook is the right choice. On Windows, from v0.37.2 the hook is registered as a native binary command (rtk hook claude), so WSL is not needed. Other agents only change the option: rtk init -g --codex for Codex, rtk init -g --gemini for Gemini CLI, and rtk init -g --agent cursor for Cursor.
The same cargo test comes back in two shapes
Now back to the opening scene. Here is the cargo test output the model reads, without the hook and with it, side by side. Both screens are examples the editors made to match the filter behavior the docs describe; real output varies by project and version.
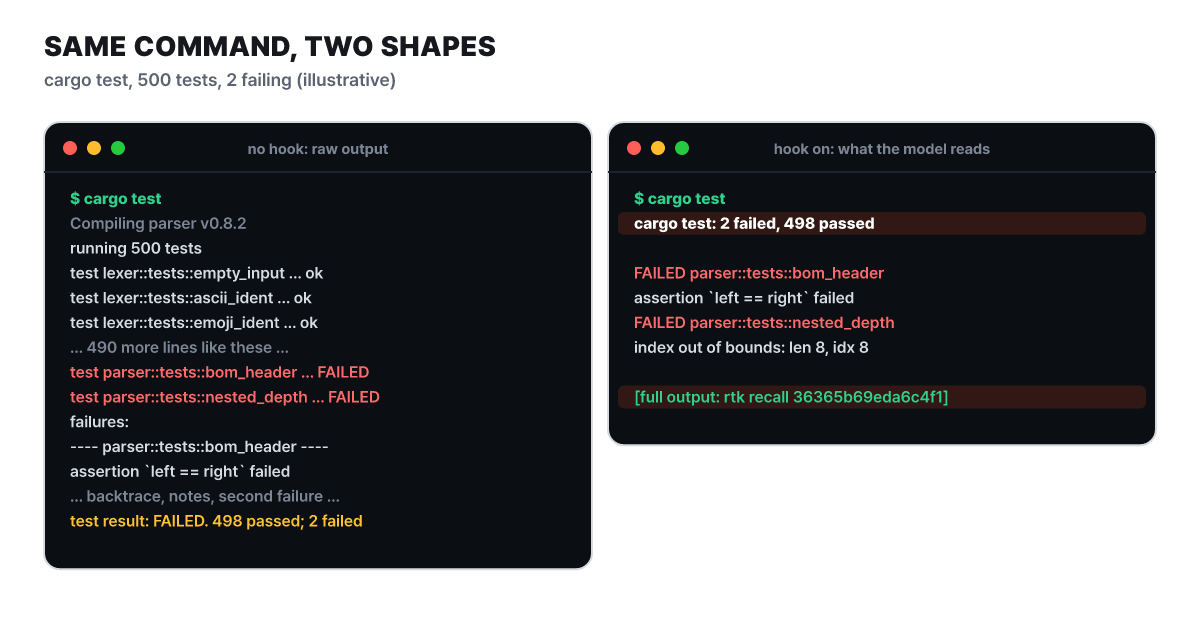 Figure 1. On the left, output that flows through including every passing test; on the right, the output the model actually reads (illustrative example)
The first line on the right is the pass/fail count, and below it only the failed tests and the key errors remain. The last line, [full output: rtk recall 36365b69eda6c4f1], is this tool’s safety net (the hash follows the format of an example in the official docs). When a command fails, or when a filter cuts a long list, RTK stores the full output in a local database and appends this hint to the end of the trimmed output. If the agent decides it needs the full output to find the cause, it runs rtk recall 36365b69eda6c4f1 exactly as the hint says, which costs one extra round trip.
The filters are designed to respect what the user asked for. The project’s design principle is to let more through when you explicitly ask for detail. cargo test shows only failures, but cargo test -- --nocapture keeps the whole output, and commands with detail options such as ls -la are treated in the same spirit. The docs also describe a safeguard in the code (never_worse) so that a filter result never ends up with more tokens than the original. You can approach the same goal by writing git status -sb, | tail -20 or --quiet into your instructions, but a person has to decide this per command, and it does nothing if the agent forgets the instruction. RTK does that work automatically in front of the command. The two approaches do not conflict, so you can use both.
The path one command takes through the hook
Let’s follow the route to see why the screen changed. In Claude Code the PreToolUse hook is what operates. Right before a tool runs, the hook receives the command string, looks it up in the rule table with rtk rewrite, and returns it rewritten as the matching rtk command. Neither the agent nor the user types the name rtk.
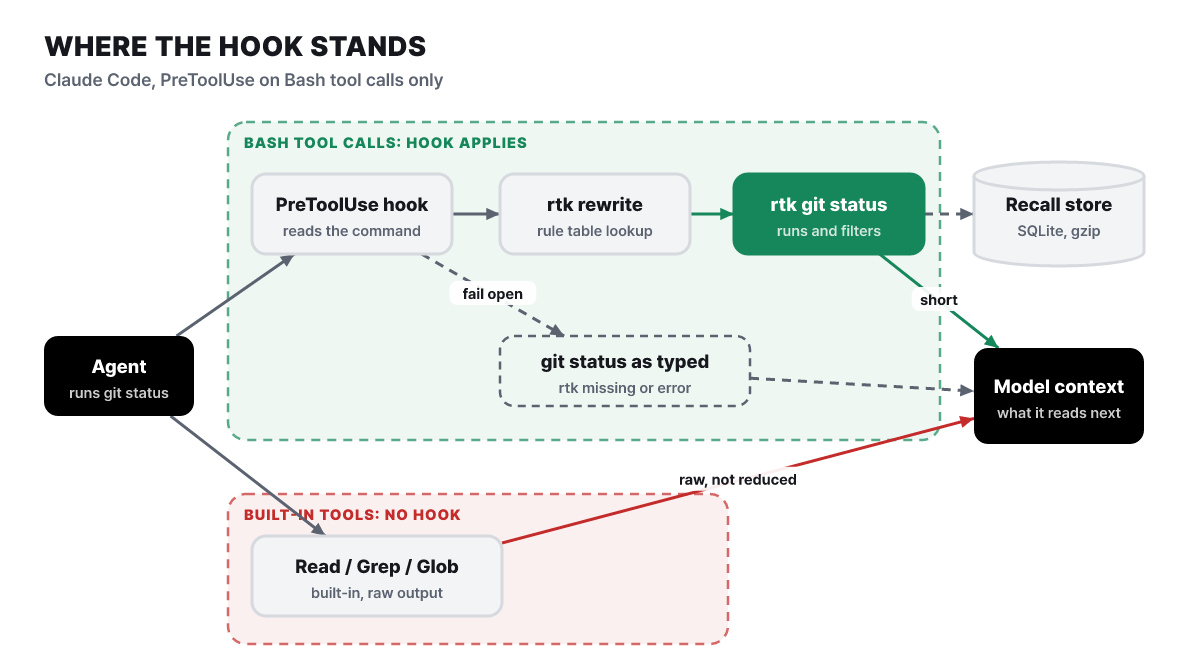 Figure 2. The hook only catches Bash tool calls. The dotted line is the path when rtk is not found or errors, plus the original being saved
The green area at the top is the path the hook stands on. One dotted line is the path for when rtk cannot be found or a filter errors: the hook exits quietly and the original command runs as is. One of the project’s design principles is “RTK must not block a command’s execution or output.” The red area at the bottom is the part that is easiest to get confused about. Results from the agent’s built-in Read, Grep and Glob do not pass through the hook, so they are not trimmed. If you want them trimmed, have the agent use shell commands (cat, rg, find) or call rtk read, rtk grep and rtk find directly.
There are rules worth knowing about how the hook rewrites a command.
- Compound commands.
cargo fmt --all && cargo test 2>&1 | tail -20is rewritten on both sides of&&,||and;, becomingrtk cargo fmt --allandrtk cargo test. Middle stages of a pipe are left as they are, and the front part is rewritten only when the last stage or the command that follows is for display - Scripts inside quotes.
bash -c "head foo && grep -R bar ."becomesbash -c "rtk read foo --head-lines 10 && rtk grep -R bar .". It handles the-cform ofsh,bash,zshandfish - Cases it leaves alone. Commands containing a heredoc (
<<) or$((, commands that already start withrtk, and commands prefixed withRTK_DISABLED=1are not rewritten - Permission rules. A command caught by a Claude Code deny rule is rejected, and one matching an ask rule requests confirmation. From v1.1.0, if the settings file cannot be read or parsed, it fails closed (blocks instead of allowing), and deny and ask rules are also applied to commands after variable assignments or wrappers
Savings differ by command
The README sums up what the filters do in four things: removing filler, grouping similar items, truncating length, and merging repeated log lines into counts. The development docs break this down into 12 strategies and give, for each, the reduction range the design aims for. Below, the strategies that the commands in this article belong to are placed on a single axis.
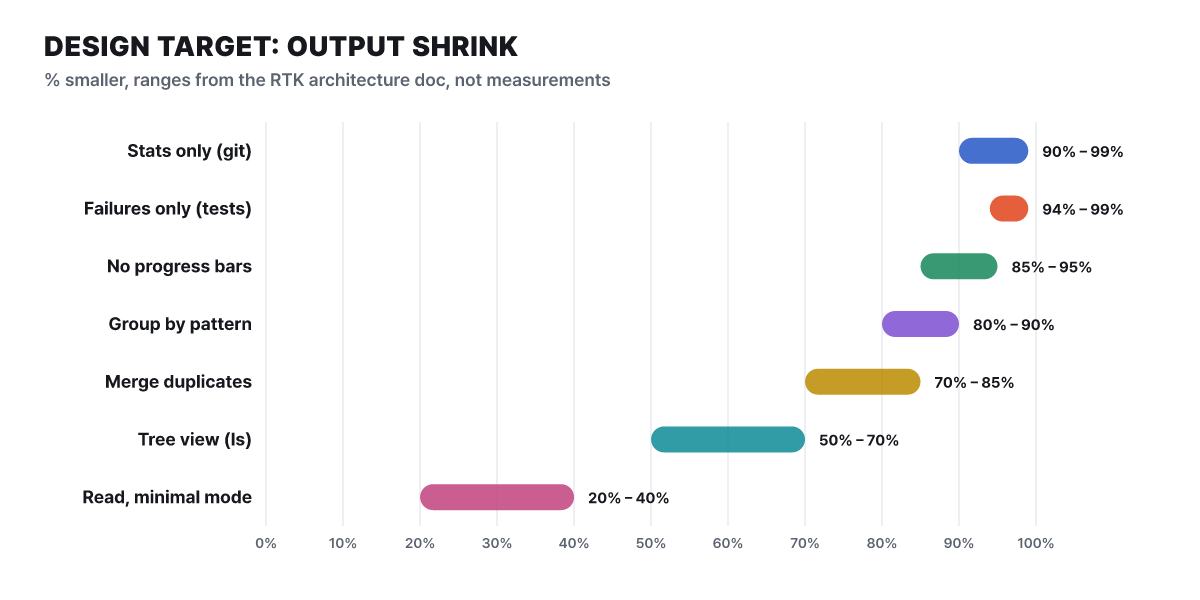 Figure 3. Design-target ranges from the development docs (not measurements)
What you notice first is that the ranges cluster toward the right. Git status and test results, whose output is structured and has only a few lines that matter, aim for 90% or more; ls, which has to keep its structure, is around half; and rtk read, which reads code, is the lowest at 20 to 40% even in minimal mode. A command with no filter passes through as it is and is recorded as 0%. These ranges are design targets, not values from your own sessions, so you check real numbers with rtk gain later. In the design docs’ git log example, about 500 characters (125 tokens) shrink to a 20-character (5-token) summary, a 96% reduction.
Here is how the representative commands in the README and official docs change.
| Command | Output the agent receives |
|---|---|
ls / tree |
Tree form with file counts |
git status |
Short summary grouped by status |
git diff |
Diff with less surrounding context and no headers |
git log |
Only hash, author and subject |
git add/commit/push |
A one-line confirmation instead of progress output |
cargo test / npm test |
Only the failures, with passing tests as a count |
pytest |
Failed items and a shortened traceback |
tsc / eslint |
Errors grouped into counts by rule and file |
docker ps |
Only the essential columns such as name, image, status and ports |
docker logs / kubectl logs |
Identical lines shown once with a count |
curl |
Response body only, headers removed |
How to read your first gain number
After using it for a few days, open rtk gain and you will see a Save% figure. This value means “how much the shell output bytes shrank.” The official docs draw the line several times: it is not the percentage by which your bill went down, only the shell output, which is a part of the input tokens, shrinks, and the model’s replies (output tokens), the prompt and the conversation history are untouched.
I calculated how the number gets diluted with two assumptions. Say a single call has 100,000 input tokens and the shell output shrinks by 90%. In a conversation-heavy session where shell output is 20,000 tokens of the input, the input becomes 82,000 tokens, an 18% reduction; in a test-and-build loop session where shell output is 60,000 tokens, it becomes 46,000 tokens, a 54% reduction.
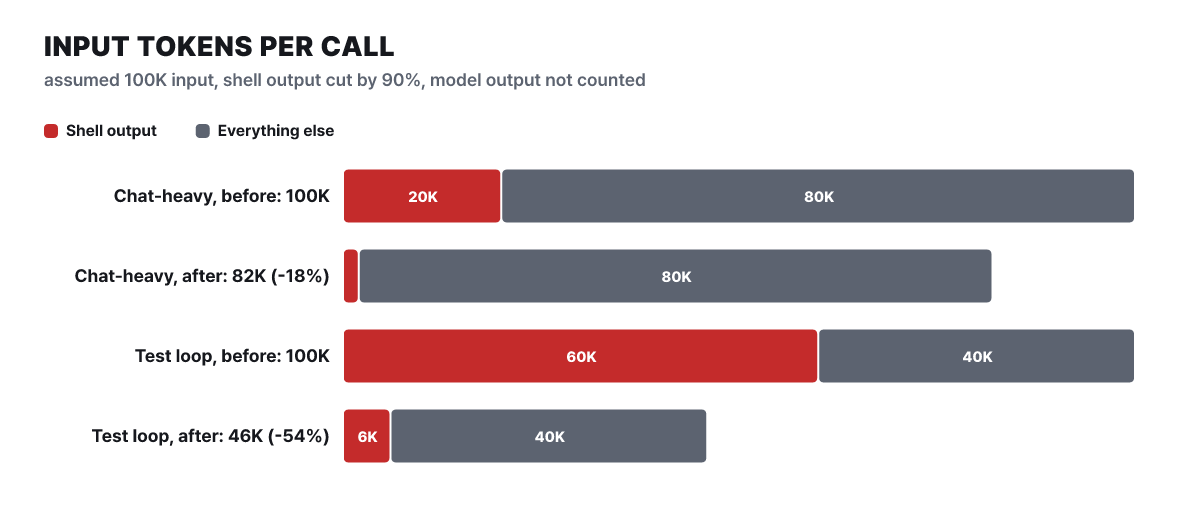 Figure 4. The same 90% filter gives a total input reduction of 18% or 54%, depending on the session type (assumed values, editors’ calculation)
The same filter gives results that differ by nearly a factor of three. That means the more of the input the shell output makes up, the bigger the effect, and since the output tokens the model writes stay the same, the reduction in your bill is smaller still. So which side your own sessions lean toward is what matters.
Values you can trust
- The Save% ratio. The same estimator is applied to the original and the result, so the ratio holds
- The fact that commands without a filter are recorded as 0%
- Long-term trends (
--daily,--weekly,--monthly)
Values to treat as rough estimates
- The token counts themselves. They are bytes divided by 4 and rounded up, with no tokenizer
- The ratio against the subscription limit in
--quota. It is stacked on the same rough estimate - Example values such as the 90% in the docs (they are sample output, not measurements)
The docs’ sample output says 50,000 input, 5,000 output and 45,000 saved (90.0%) over 10 commands, but it carries the caveat that these are “example values.” The README’s 60 to 90% is also the project’s own material, and within what the editors checked, no independent third-party measurement turned up. If you need an exact value, put the original and the filtered result through the model’s tokenizer and count them yourself.
There are also commands that check “is it taking effect” rather than giving numbers.
rtk gain --history      # last 10 commands and their savings
rtk discover            # find commands that passed without a filter, with estimates
rtk session             # share of recent-session commands that went through rtk
rtk -vvv git status     # show the filtering process in detail on stderr
rtk cc-economics        # view alongside cache write and read volumes
The docs say that if commands keep showing up in the rtk discover list after installation, it is a sign the hook is not active in that agent. When the adoption rate in rtk session is low, the cause is often that it was turned off with RTK_DISABLED=1, or that the hook is not active in a particular subagent. The official docs say you need not worry about the prompt cache. The filter runs once per command and fixes the output into the history, so the prefix the cache matches against does not change, and since a cache write costs 1.25 times the input price and a read 0.1 times, the smaller the result, the lighter it is both the first time and each time it is re-read per turn.
Check that it hooks your own agent
The README says 18 tools are supported, and the table in the agent support doc counts Copilot (VS Code and CLI) and Trae (project and global) separately, for 20 rows. The table matters because “supported” does not automatically mean “output shrinks.” It depends on what the agent’s hook API allows. Of the 20 rows, 16 allow command rewriting and 14 have rtk init install that hook, while 8 allow post-hoc output compression and 7 have it installed for them.
| Agent | What it can hook |
|---|---|
| Claude Code | Rewriting, blocking, output compression, session-start hook and proxy routing are all possible. The widest range |
| Codex | A rewrite applies only together with an explicit allow decision. Otherwise the hook fails and the original command runs |
| Gemini CLI | Each time the input is modified, a “tool input was modified” system note is attached and a few tokens come back |
| Kilo Code, Cline, Windsurf (Devin), Kimi Code, Antigravity | They use a rules file instead of a hook and merely ask the model to use rtk <command>. For now it does not block, rewrite or compress |
| Roo Code | No hook. Only the proxy route exists |
| OpenCode | The plugin is installed only on 1.18.29 or later, and rtk must be on the PATH the agent sees |
With an agent that uses only a rules file, no rewriting happens even after rtk init finishes. This is where [awareness] level becomes important. The default, default, does not tell the agent about RTK, and RTK.md only explains “how to read trimmed output.” Raising it to high also explains rtk gain and the workarounds, and full tells the agent to prefix every command with rtk. An agent without a hook is always at full.
The docs also give a troubleshooting order for when the hook seems not to work. Confirm the install with rtk --version and rtk gain, run rtk init --global again and restart the agent, then check the registration with rtk init --show and the rtk entry in ~/.claude/settings.json. The repository also has scripts/check-installation.sh, which checks the install, paths and hook state in one go.
Escape hatches when the trimmed output is not enough
Filters reduce information, so a day will come when you need the part that was trimmed. The order to use then is as follows.
- Recover it.
rtk recall <hash>from the hint returns the original that was stored. When you look yourself, search withrtk recall <hash> --grep patternand list entries withrtk recall --list. The store is built-in SQLite by default with lossless gzip compression, and the default retention limits are 10 MiB per entry, 200 entries (oldest deleted first) and 30 days. You change the mode withrtk config recall sqlite|tee|disabled - Raw just once. Prefix a command with
rtk bypass <command>or something likeRTK_DISABLED=1 git rebase main, and only that command skips the filter. To turn off recovery storage for a single run, prefixRTK_RECALL=0 - Exclude entirely. Put commands where state matters into
[hooks] exclude_commands = ["git rebase", "docker exec"]in the config and the hook leaves them alone. An entry that starts with^is a regular expression - Which filter is hiding things.
rtk gain --recallsshows, per filter, “the share of trimmed output that the agent went back to retrieve.” A filter with a high share often hides information the agent needs, so it is a candidate for raising the limit or adding to the exclude list, while a low share means the cut part really was noise
You can also write your own filters for your own commands. Define them in .rtk/filters.toml (project) and ~/.config/rtk/filters.toml (global) with fields such as match_command, strip_lines_matching, keep_lines_matching, max_lines and on_empty, and verify them with input and output examples under [[tests…]]. Because a filter changes what the agent sees, applying a .rtk/filters.toml the moment you pull it from a repository could let someone else’s rules blind your agent. So RTK quietly skips that file, keyed on the SHA-256 of its contents, until you confirm it with rtk trust. The repository docs also state the limit: this is a device for consent and tamper evidence, not a sandbox, and an attacker who can write files with the same user privileges can edit the trust list too. When you open a repository you do not know, do not add --yes to rtk trust; read the contents.
Choosing an edition and the proxy
There are three things you can download, so tell them apart before installing. The install steps earlier were based on the first row (rtk).
| What you download | License | What it contains |
|---|---|---|
rtk |
Apache-2.0 + BUSL-1.1 | The hook, all command filters, the compression engine |
rtk-oss |
Apache-2.0 only | The hook and command filters (no engine) |
rtk-proxy |
BUSL-1.1 | A separate daemon that compresses API traffic |
rtk and rtk-oss install an executable with the same name, so they cannot coexist. Homebrew declares a conflict between the two formulas and blocks the second install, while the deb and rpm packages declare no conflict and stop at a file collision, so remove one before installing the other. You get rtk-oss with the install script plus RTK_EDITION=oss, or with brew install rtk-ai/tap/rtk-oss. Without the engine you lose rtk pipeline, rtk methods, rtk tasks and PostToolUse compression (the feature that, with the rtk:posthook extension enabled in pipeline.toml, also compresses the agent’s Read and MCP output), but the parts you use every day are the same: the rewrite hook, all command filters, rtk gain and rtk discover.
BUSL-1.1 is a source-available license: the source is public, but it does not meet the open source definition. According to the repository docs, use in production is free, while offering RTK or its derivatives to third parties as a commercial product or service is outside the permitted scope. If your company policy requires an OSI-approved license for every binary, pick rtk-oss. The rtk formula in the official Homebrew repository lists the license as Apache-2.0 while the formula in the tap lists Apache-2.0 and BUSL-1.1, so if policy is at stake, installing the one with the unambiguous edition name is the safe route.
The proxy works one level higher. If the hook shortens shell command output, rtk-proxy shortens the entire request the agent sends to the model (conversation history, tool results, file contents). It is a local HTTP daemon running on 127.0.0.1:8080; you point the agent’s ANTHROPIC_BASE_URL at the daemon, or start the daemon and route Claude Code through it with the single line rtk claude. It is an optional choice, independent of the hook. Because requests pass through this process, it widens the trust boundary by one more link, so turn it on knowing the scope the docs state. Prompt and response bodies are not stored; only CCR, an opt-in feature, keeps the compressed originals in rtk-proxy-memory.db for 7 days. Remote statistics are off by default, and only after you consent with rtk telemetry enable does one anonymous ping a day go out (version, OS, command count, top command names, savings rate); the docs state explicitly that command contents and file paths are not sent.
It is also good to know the release flow of the last ten days. Pre-releases such as dev-1.1.0-rc.574 are posted often in the release list, so ordinary users should stick to stable releases or the package manager version.
- v1.0.1 Fixed gain to point only to commands that exist, and made proxy start follow the bind setting
- dev-1.0.2-rc.567 Compresses repeated Ruff and SQLFluff explanations
- Pre-releases rc.568 to 573 Fish script wrapping (opt-in), improved compression of Angular build tables
- v1.1.0 Block when permission settings cannot be read, pass-through for help options, no git rewriting in Claude Code managed worktrees, integrity check of rewritten commands, keep pytest error lines
How to undo it
If you do not like it, remove it in the reverse order of installing. First strip out the hook and the instruction file.
rtk init -g --uninstall # remove the hook, RTK.md and the settings.json entryThen delete the executable according to how you installed it: brew uninstall rtk for Homebrew, winget uninstall rtk-ai.rtk for winget, and cargo uninstall rtk for Cargo. If you set up the proxy, the ANTHROPIC_BASE_URL that init wrote is removed too (when it points to the daemon address). The statistics records remain separately: on macOS, ~/Library/Application Support/rtk/history.db (kept 90 days by default) stays as it is, so check and reset it with rtk gain --reset or delete the file yourself. After removing the hook, restart the agent and run cargo test once to see that the output is back to its original shape, which closes the loop that began with the opening scene.