HeyGen's open-source HyperFrames turns HTML into video
Build a 6-second title scene in one HTML file with HeyGen's open-source HyperFrames, then follow the frame math, lint codes, render time and render paths.
Picture a developer who has to attach the same 6-second title clip to every release note. Opening a video editor is overkill for something that short, but doing it by hand each time means reopening the project, finding the right spot and exporting again just to change one line of title text. HeyGen’s open-source HyperFrames describes that clip in a single HTML file, then captures the page one frame at a time and stitches the frames into an MP4. This article builds that one 6-second scene and follows the attributes, rules and render process along the way. The code is an example the editorial team wrote to match the official documentation, and no terminal output is shown because we did not run it ourselves.
As of 2026-10-27 UTC the repository has 72,749 stars and about 6,600 forks, and the license is Apache-2.0. That is nearly 800 more than the roughly 71,900 stars we saw two days earlier (October 25). Development is fast too. Eleven stable releases shipped in a day and a half, from v0.8.195 at 03:49 UTC on October 25 to v0.8.205 on October 26, and the latest version on npm is 0.8.205. You need Node.js 22 or later and FFmpeg, and rendering on your own computer costs nothing and needs no account.
There are three ways in. The first, which the documentation puts up front, is the Studio app: you describe the video you want and an agent inside the app builds it. It signs in with a free HeyGen account and comes for Mac, Windows (64-bit) and Linux. The second is installing skills into a coding agent such as Claude Code or Codex, and the third is using the CLI directly. This article takes the third path. An agent ends up writing the same HTML file and running the same CLI commands, so hand-building one scene makes it easy to read what happens on the other two paths.
Start with one folder and one file
Checking your environment, creating a project and previewing it in the browser take three lines.
npx hyperframes doctor           # check your computer's environment, including FFmpeg
npx hyperframes init my-video    # create the project folder
cd my-video
npx hyperframes preview          # live preview in the browser editor
According to the official docs, the video itself is a single index.html at the project root. That file is the top-level composition. When a scene grows, you split other HTML files into a compositions/ folder and embed them, and media and fonts go in assets/. Today’s scene is small enough that index.html alone is all we need.
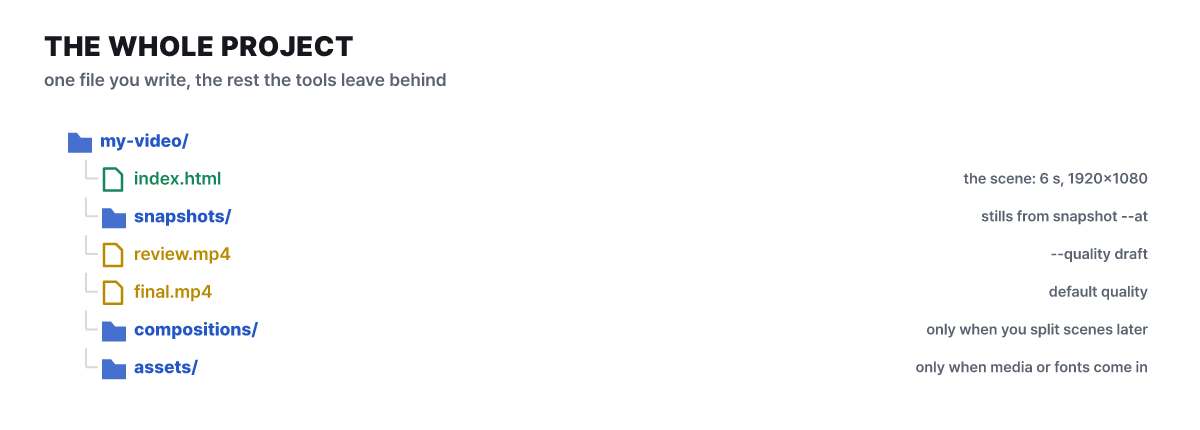 Figure 1. You write one file, and the commands leave the rest behind (drawn by the editorial team to follow the order of this article)
The folder name and the output file names are just examples for this article. If you do not pass --output when rendering, the results pile up in the project’s renders/ folder.
The root element sets the size and length of the video
The outer frame of a video is a single element carrying data-composition-id. On it you write the width and height in pixels (data-width, data-height), the start (data-start="0") and the length (data-duration). The docs state flatly that the data-duration on the root is the render length. The compiler reads this value before any composition script runs, so a script or variable cannot change it afterward. If you leave the length out, it is inferred from the registered timeline or the media length, but writing it down is clearer when you want full control of the scene.
Below is the whole scene we will build. It is 1920x1080 and 6 seconds long. A title fades up against a dark navy background and fades out, and one line appears in the last 1.5 seconds.
<!doctype html>
<html lang="en">
<head>
  <meta charset="UTF-8" />
  <meta name="viewport" content="width=1920, height=1080" />
  <script src="https://cdn.jsdelivr.net/npm/gsap@3.14.2/dist/gsap.min.js"></script>
  <style>
    body { margin: 0; }
    #stage { position: relative; width: 1920px; height: 1080px; overflow: hidden; background: #101828; }
    .clip { position: absolute; inset: 0; display: grid; place-items: center; }
    #headline { font: 800 140px sans-serif; color: #fff; }
    #tagline { font: 700 96px sans-serif; color: #ffb454; }
  </style>
</head>
<body>
  <div id="stage" data-composition-id="launch" data-start="0" data-duration="6"
       data-width="1920" data-height="1080">
    <section id="title" class="clip" data-start="0.5" data-duration="4" data-track-index="1">
      <h1 id="headline">v1.0 is out</h1>
    </section>
    <section id="endcard" class="clip" data-start="title" data-duration="1.5" data-track-index="1">
      <p id="tagline">Read the notes</p>
    </section>
  </div>
  <script>
    const tl = gsap.timeline({ paused: true });
    tl.fromTo("#headline", { opacity: 0, y: 48 }, { opacity: 1, y: 0, duration: 0.8, ease: "power3.out" }, 0.5);
    tl.to("#headline", { opacity: 0, duration: 0.5 }, 4);
    tl.fromTo("#tagline", { opacity: 0, scale: 0.9 }, { opacity: 1, scale: 1, duration: 0.5, ease: "power2.out" }, 4.5);
    window.__timelines = window.__timelines || {};
    window.__timelines.launch = tl;
  </script>
</body>
</html>
The part of the styles worth noticing is #stage. As in the docs’ minimal example, the root has to be a box with a real size (position: relative, fixed width and height, overflow: hidden) so that the inset: 0 on .clip is measured against the whole video frame. The font is deliberately the system sans-serif. For a real video, it is safer to put the font file in the project and declare it with @font-face.
The attributes that place two clips on the timeline
The docs call an element that appears on screen for a stretch of time a clip. A clip carries an id, data-start and data-duration. An image defaults to 3 seconds if you omit the length, and video and audio default to their source length, but an ordinary HTML element must have a length. The class="clip" that the docs recommend still takes up time without it, but it lets the editor and lint recognize the element as a clip and supplies the full-frame box rules. data-track-index is only the row number shown in the browser editor and rendering does not read it, so the stacking order has to come from CSS z-index.
The data-start="title" on the second clip stands out. Writing another clip’s id instead of a number means “the moment that clip ends.” Three forms are supported: clip-id, clip-id + seconds and clip-id - seconds. A reference can only point within the same composition, and two clips pointing at each other in a cycle is not allowed. If you shorten the title clip from 4 seconds to 3, the end card moves up by the same amount on its own.
It is also worth doing the seconds-to-frames arithmetic once. The default fps is 30, so 6 seconds is 180 frames, and a frame number is the time in seconds times 30. The title appears at frame 15, starts fading out at frame 120 and the clip ends at frame 135.
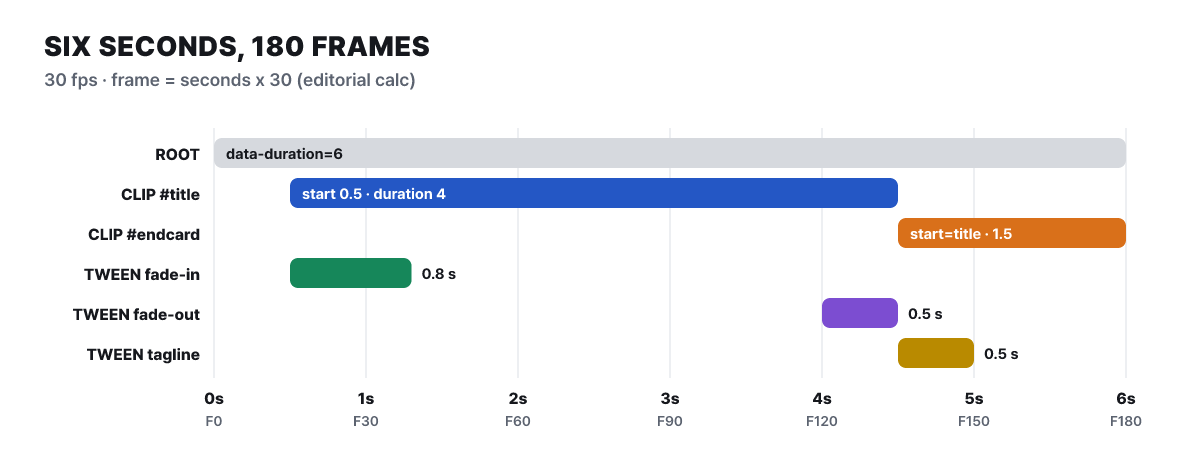 Figure 2. Time placement of two clips and three tweens (frame numbers calculated by the editorial team)
The title clip ends at 4.5 seconds and the end card starts at the same moment. The tween that fades the title out (4.0 to 4.5 seconds) is set to finish just before the clip disappears. The framework works out from the attributes when a clip is shown or hidden, so the tweens only handle motion while the clip is visible.
Register the paused timeline under the same name
GSAP timelines handle the motion. The docs call GSAP the primary runtime, and its rules are short. Create the timeline with { paused: true } and register it on window.__timelines with a key identical to the root’s data-composition-id. That is why this scene’s key is launch. Give every important tween an explicit position in seconds. If the start and end states matter, the docs recommend fromTo() over from(), because it stays stable when the timeline is rewound or jumped around.
Two more rules are worth knowing before you break them on purpose. The first is to animate with transform and opacity. Changing top, left, width or height on every frame makes the capture stutter, which is why the title rises with y in this scene. The second is not to apply opacity to the clip element itself. Showing and hiding clips is the framework’s job, so this scene keeps the clips as section elements and puts the tweens on the h1 and p inside them.
If you add video or audio, one more rule applies. Do not call play() or pause() on a media element, and do not change its currentTime. Playback and seeking belong to HyperFrames, and if you need to move or shrink a video, you move the element that wraps it.
The moment frame 90 is captured
How does one frame of this scene, say the 3-second mark, become an image? Rendering does not play the video. It raises the frame number one step at a time and asks, “What does this number look like?”, and the answer is decided only by that number. The engine computes the time as an integer calculation of floor(frame) / fps and never reads a real clock. A frame adapter receives seekFrame(frame) and moves every animation to that time, Chrome’s headless beginFrame grabs the screen in one shot, and then FFmpeg packs the frames together and mixes the audio.
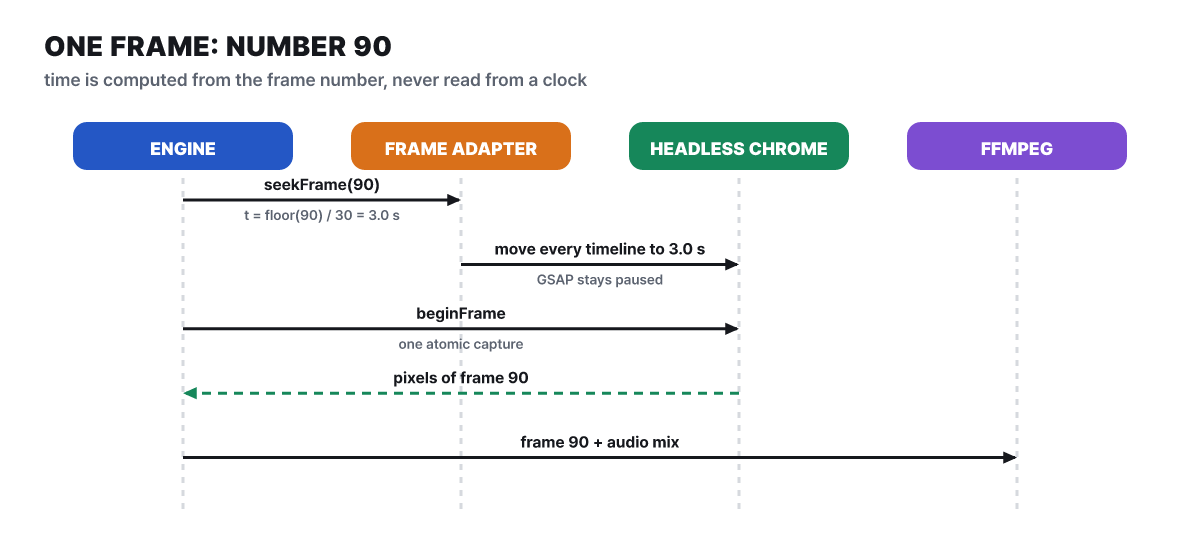 Figure 3. Frame 90 is 3.0 seconds, and the GSAP timeline is not played but only moved to that time
That is why the guarantee that the same input produces the same video holds, and keeping it requires the composition to cooperate. Date.now(), which reads the current time, requestAnimationFrame and system timers that rely on screen refresh, an unseeded Math.random() and downloading assets in the middle of rendering are the typical causes of unstable results. The frame size, fps and variables are locked before frame 0 is captured, and every composition must have a finite, fixed length.
On a different machine, fonts and the Chrome version can shift pixels by a notch. Where you need exactly identical output (CI, delivery files), run npx hyperframes render --docker --output output.mp4. Docker pins the Chrome version, the font set and the FFmpeg encoder, so your own computer drops out of the inputs. Preview and render use the same runtime, so they look the same but run at different speeds. Preview is real time and can stutter on a heavy scene, while render handles one frame at a time, so it never drops a frame and simply takes longer.
What lint calls it when you break the rules on purpose
Break a rule and you usually do not get an error that stops everything. You get a quietly wrong video. If you do not register the timeline, you get a still image with no motion. That is why there are two checks before rendering. lint reads the HTML statically, and check actually opens it in a browser and looks at the runtime, layout, motion and even text contrast. The docs’ lint rule list now stands at 139 codes, each with a level (error or warning) and a fix. Here are just the ones you are likely to meet in today’s scene.
| What you break | lint code | Level |
|---|---|---|
Delete the window.__timelines.launch = tl; line |
gsap_timeline_not_registered |
Error |
Change the key to main so it no longer matches the root id |
timeline_id_mismatch |
Error |
Put an opacity tween directly on the #title section |
gsap_animates_clip_element |
Error |
Use Date.now() or Math.random() in the title |
non_deterministic_code |
Error |
Tween top, left, width or fontSize |
gsap_non_transform_motion |
Error |
Use repeat: -1 with no end |
gsap_infinite_repeat |
Error (warning if a length is set) |
Remove class="clip" from a clip |
timed_element_missing_clip_class |
Warning |
Use a CSS transition for motion |
css_transition_used |
Warning |
A scene with video will also run into codes such as video_missing_muted (the sound is unknown), self_closing_media_tag (closing it as <video /> swallows the elements after it) and missing_local_asset (it points at a file that does not exist). The meaning of the levels is spelled out in the docs. Errors fail check by default, warnings fail only with --strict, and render stops on warnings only with --strict-all.
Breaking things on purpose is the fastest way to learn them. We suggest breaking one thing at a time, checking, and then restoring it.
- Copy
index.htmlaside, delete only thewindow.__timelines.launch = tl;line, then runnpx hyperframes lintand see whether an error code appears. - Restore the line and change only the key to
main, then compare whether the mismatch is caught under a different code. - Restore that, put an opacity tween directly on the title section, and check whether the problem goes away when you put the same effect on the inner
h1. - Finally, remove only
class="clip"and compare how the warning is treated differently from an error, including withcheck --strict.
Three snapshots, a trial render, then the final render
Some timelines look fine when played continuously but break when you jump straight to a particular frame. So before rendering, take still images at a few points and look at them. For this scene, 0 seconds (it should be empty), 1.3 seconds (the title fully risen) and 5 seconds (the end card showing) are the right ones.
npx hyperframes snapshot --at 0,1.3,5
npx hyperframes render --quality draft --output review.mp4
npx hyperframes render --output final.mp4
The local render quality names are draft, looks and high, and the default with no option is looks (CRF 16). The docs describe it as close to visually lossless at 1080p. draft lowers only the capture and encoder quality and leaves the timing untouched, so it is enough as a trial run to check length and sound. MP4 is the default format, and MOV (ProRes 4444 with alpha), WebM (VP9 with alpha), GIF, PNG sequences and HLS can also be chosen with --format. For a transparent background you must not paint a background on html and body, and transparency means nothing for a video like ours that fills the whole frame with a background color.
4K keeps your composition layout and captures it at a higher resolution with --resolution 4k. Only integer multiples work (2x of 1080p), it cannot be combined with HDR in one pass, and a 1080p source video or a fixed-size canvas gains no detail when captured at 4K. Only text, SVG and CSS shapes get sharper.
Rendered files carry hyperframes_renderer and hyperframes_version tags in the container metadata. They are unsigned diagnostic hints, not proof of origin, and you can remove them with ffmpeg -i out.mp4 -map_metadata -1 -c copy clean.mp4.
The one line of CSS that turns 9.8 seconds into 25.0 seconds
Once a scene grows, render time becomes a concern. A measurement in the official performance docs gives a feel for it. The same 1920x1080, 300-frame composition rendered in 9.8 seconds, and after one CSS declaration was changed it took 25.0 seconds. It is the median of three runs, and the docs say they confirmed by pixel comparison that the picture is the same.
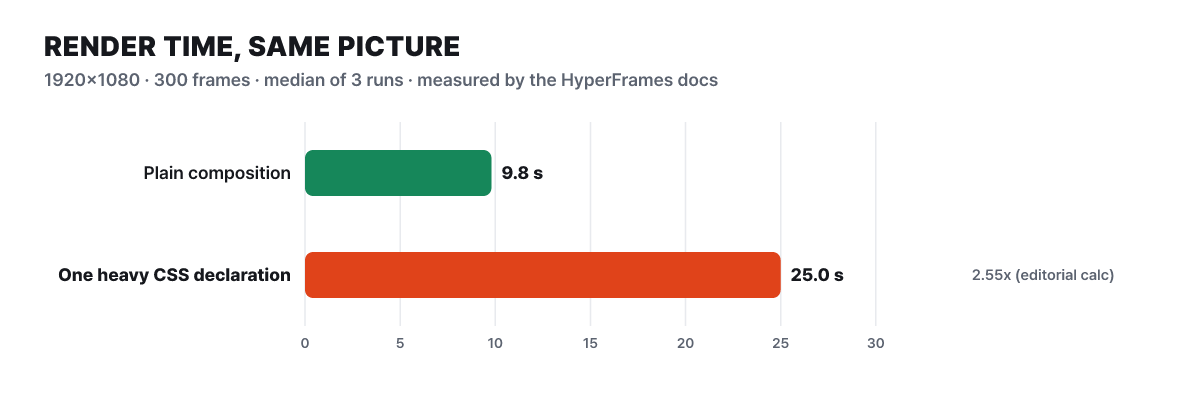 Figure 4. The picture is identical and only one line of CSS differs (measurements from the HyperFrames docs, ratio calculated by the editorial team)
The ratio is 2.55x. Converted to frames per second, the speed falls from about 30.6 frames per second to 12 (300 frames divided by the elapsed time, calculated by the editorial team). Our scene is light, so this may not feel real, but in a pipeline that produces dozens of the same scene every week, that time multiplies right along with the count.
The docs list where to look first by symptom. If only one scene stutters in preview, check whether it has many large blurs, masks, shadows or moving layers, and if it freezes when an image first appears, the source image is too large. Large filter: blur() and backdrop-filter, dozens of elements with shadows moving at once, and source images far larger than the video size are the typical expensive cases. For a 1920x1080 composition, a 3840x2160 source is enough to cover up to 2x the screen, and anything larger only adds memory and decoding work. Static blurs and piles of textures should be replaced with pre-rendered images, the docs say. Transparent WebM uses the CPU-heavy VP9 encoder, so it takes much longer than MP4. There is also a prescription of measuring instead of guessing. With preview running, record Performance in Chrome DevTools: Paint or Composite points to filters, shadows and masks, Layout points to layout calculation, and Script points to the code you wrote. Change only one thing at a time, measure again and keep the change that moved the bottleneck.
Where to run the same file, and what changes when you hand it to an agent
So far we ran render on our own computer. The same project can run elsewhere, and the fork in the road is who operates Chrome and FFmpeg.
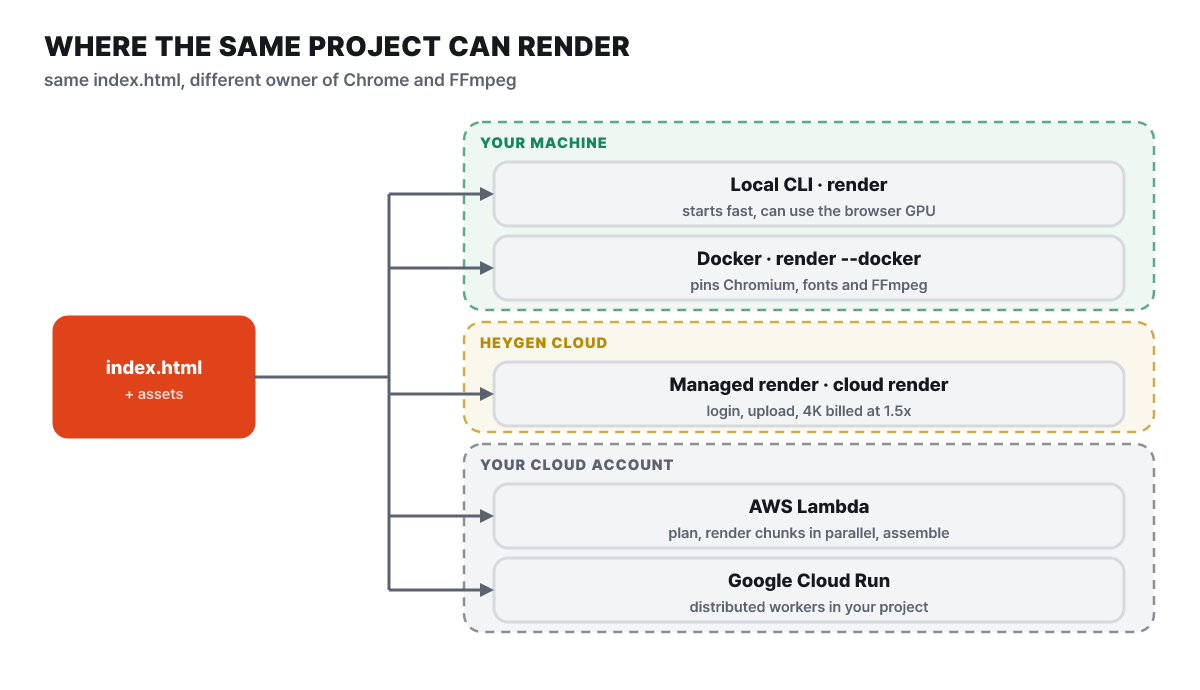 Figure 5. The criterion for choosing a path is who runs Chrome and FFmpeg
The official docs advise the CLI when a person or CI starts the job and @hyperframes/producer when a Node service starts it. To hand off the infrastructure, two lines, hyperframes auth login and hyperframes cloud render, upload the project and bring the result back into renders/. The options are fps 1 to 240, quality draft, standard (default) and high, formats mp4, webm and mov, and resolutions 1080p and 4k, with 4K billed at 1.5x. A compressed project can be up to 200MB, and media of 5MB or more is uploaded separately and linked through unsigned public URLs. Check the list with --dry-run before uploading, and list files you do not need in .hyperframesignore to exclude them. For distributed rendering in your own cloud account there are AWS Lambda and Google Cloud Run. Lambda splits the video into pieces with Step Functions, renders the pieces in parallel and then merges them, and billing is GB-seconds (execution time times memory) plus state-transition charges. The docs’ progress example of 480 frames, 5 Lambdas and $0.0214 is only an example and not a baseline for cost. The cloud path does not have HLS output yet.
If you hand the same scene to an agent, the agent ends up writing this human-written file. Installation starts by planting skills. Claude Code can install through a plugin marketplace.
npx hyperframes skills update                       # install the 4 core skills from the current main
claude plugin marketplace add heygen-com/hyperframes
claude plugin install hyperframes@hyperframes       # Claude Code plugin, invoked as /hyperframes:hyperframes
npx skills add heygen-com/hyperframes, which fetches a copy of the skills, is a registry copy and can lag the latest code by a few hours, so the README says skills update is better when you need the newest version. There are four core skills. /hyperframes covers the contract and work order for making a video, /hyperframes-cli covers the commands to create, check, render and publish, /hyperframes-registry covers about 450 ready-made blocks such as transitions, captions, charts and maps, and /media-use covers getting media such as music, sound effects, images and voice. Skills for Figma, slide decks and migrating from Remotion are installed when needed. The first request the quickstart docs suggest is “Using /hyperframes, make a 10-second product intro video for https://example.com”, and the agent leaves a working folder and opens the browser editor.
The comparison point is Remotion, which writes video in React. The HyperFrames docs say that when they gave the same request to Claude Code (Opus 5.5) once each, HyperFrames produced an MP4 in 11 minutes 50 seconds with 4 HTML files (822 lines), and Remotion in 12 minutes 30 seconds with 10 TypeScript files (1,037 lines) and about 950MB of node_modules. It is one run by the vendor, and the docs themselves admit one run cannot settle quality, so the difference that remains is whether the result is a React project or an HTML file you can open in a browser. The same document says Remotion is older, with more templates and production examples and more mature cloud rendering, and that for teams already using React, components and type-checked inputs carry straight over. The remotion-to-hyperframes skill for coming over from Remotion refuses state-based motion or UI kits like MUI instead of forcing an approximation, tells you why, and verifies with frame-by-frame similarity (SSIM). The direction goes one way only.
Before handing an agent a long job, it helps to sort out where the data goes.
- Local rendering never lets the project leave your computer, but cloud rendering uploads the project to HeyGen. Media of 5MB or more becomes an asset at an unsigned public URL, so look at the list first with
--dry-run. - The docs state that the CLI sends anonymous statistics such as command names and render performance, and does not send project names or video content. To turn it off, use
npx hyperframes telemetry disable. - An agent's prompts go to the provider of the agent you use, and the charges come out of that plan. Only HeyGen voices, avatars, generated clips and cloud rendering cost credits.
- A composition an agent builds is a web page that loads external script and media URLs, like GSAP from a CDN. When you put it in an automated pipeline, review those URLs, and keeping scripts and media inside the project also fits the rule against external access during rendering.
- The hosted connectors used from Claude.ai or ChatGPT make videos inside your HeyGen account and cannot use a local project folder or local rendering. If you want to keep files and verify them, the local path is the right one.