CLI-Anything turns any program into an agent CLI
A CLI made by CLI-Anything has six layers: agent guide, commands, project files, backend, real program and result checks. What each does and what to verify.
Hand an agent a 40-step task through screen clicking, and if it receives a fresh screenshot at every step, 40,000 to 72,000 input tokens go to screenshots alone. That is the editors’ calculation: Anthropic’s documentation puts one screenshot at roughly 1,000 to 1,800 input tokens, multiplied by 40. CLI-Anything (repository HKUDS/CLI-Anything) sidesteps this cost structure by attaching a command-line entry point for agents to the program itself. Since the repository was created on March 8, it has collected about 57,000 stars (checked Oct 27 UTC). This article takes that entry point apart from top to bottom: on the surface it is one command line, but what layers does it pass through before it produces a real file? Because each layer does a different job, we also point out which layer to suspect when something goes wrong.
A loop that takes one photo per click
The structure of the screen approach, known as computer use, is simple. The model requests an action such as screenshot, left_click, type, key or scroll, the developer’s code runs it on a sandbox screen, and the result is returned. A screenshot comes back as an image, but an action such as a click returns only a short confirmation, so to see whether the click landed you have to take another screenshot. Anthropic’s documentation notes that this round trip repeats and that screenshots pile up quickly on long tasks.
The documentation’s list of limitations is specific too. Clicks can miss small targets, the model sometimes assumes success and moves on without checking the result, and dropdowns and scrollbars are awkward to handle with a mouse, so keyboard shortcuts are recommended. Resolution also affects accuracy: the documentation recommends 1024×768 or 1280×720 for general desktop work and 1280×800 or 1366×768 for web apps, and says to avoid going above 1920×1080. Recent documentation describes the new computer_toolset_20260801 bundle of 17 tools, which includes a zoom action for viewing part of the screen at native resolution. The tooling keeps improving, but the loop of receiving an image for every action stays as it was.
The figure below puts the same single step, changing something and checking the result, side by side in the two approaches. Look at the point where the image attached to the arrow on the left becomes text on the right.
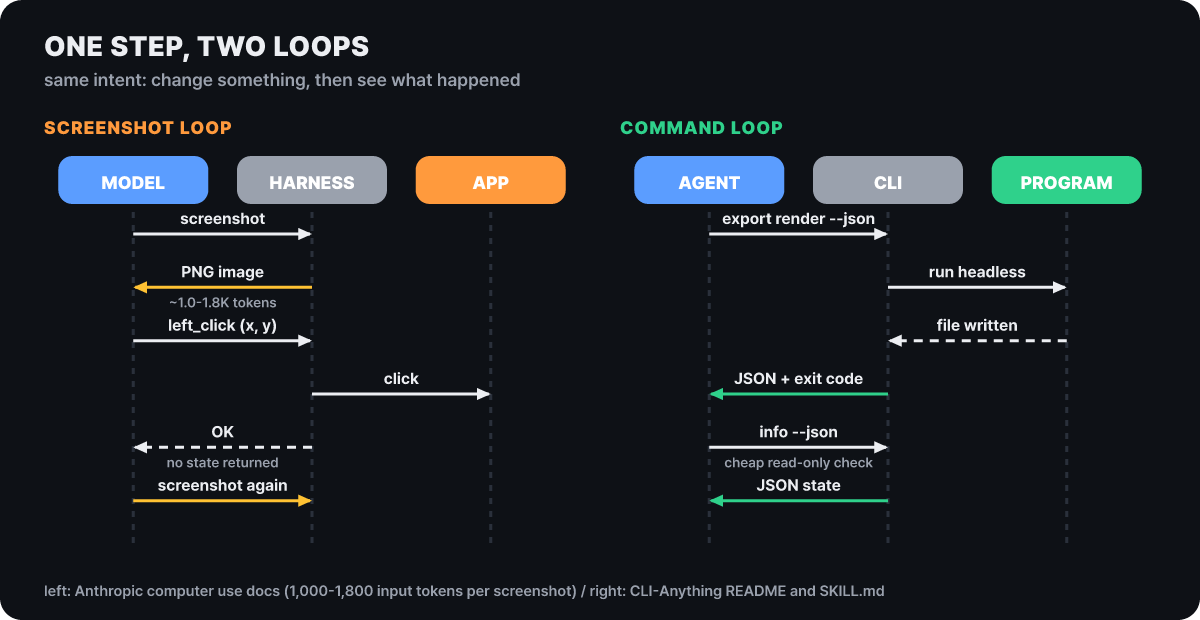 Figure 1. The screen approach receives an image whenever it needs to check; the command approach receives one line of JSON
The place to notice in the right-hand loop is the last two lines. A cheap read-only command (info) can re-read the state, so no new image is needed just to check. A technical report posted to arXiv on June 2, 2026 (“CLI-Anything: Towards Agent-Native Computer Use”) names four weaknesses of screen-based agents. Coordinate-based actions break when the screen changes; timing has to be matched to animations and response delays; visual information is converted into computable state, and structure is lost along the way; and by imitating human hand movements, the approach fails to use what models do well, handling structured data. However, the report does not include a table that measures the success rates of the two approaches on the same tasks. In the project README’s roadmap, too, a benchmark suite for agent task completion remains an unchecked item. So the figure above depicts a difference in cost and structure, not a measurement of which side succeeds more often.
Six layers one command passes through
The generated CLI passes a command line typed by the agent through six layers in turn and produces a real file. The six layers are names the editors use to divide up the harness guide (HARNESS.md) and the README examples; the documents themselves do not number them. In the figure, the upper horizontal row is the surface the agent touches directly, the upper right is the state left on disk, the bottom is where the real program works, and the lower left is the step that checks the result.
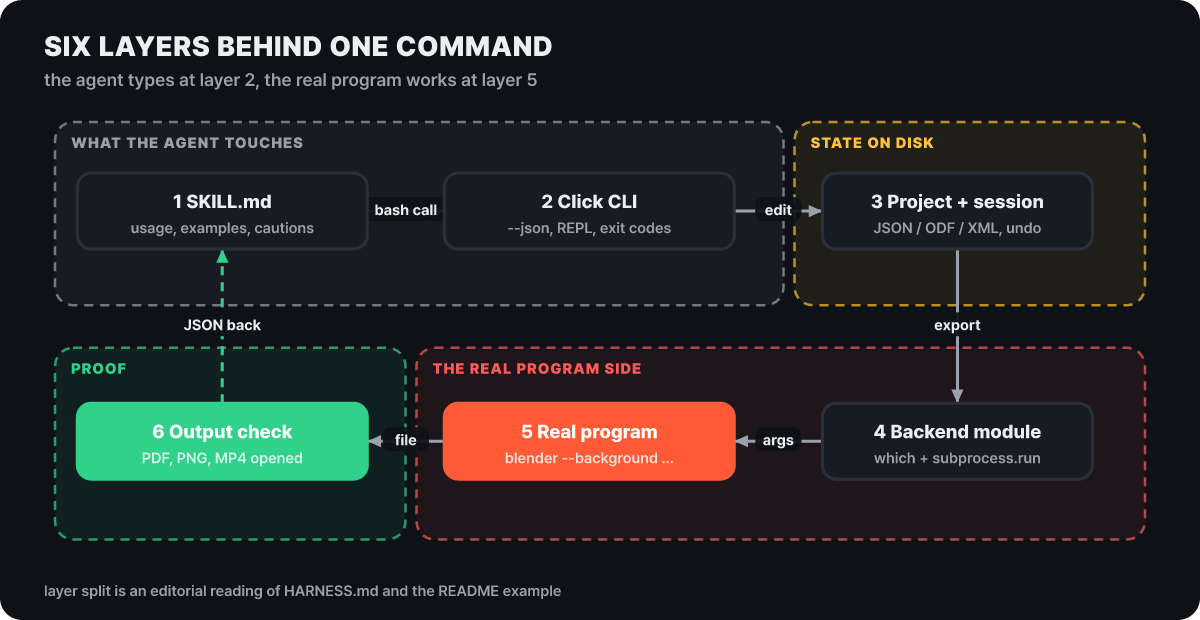 Figure 2. A command descends from layer 1 to layer 5, and the result checked at layer 6 comes back up to layer 1 as JSON
The screen approach hides this structure, whereas here each layer fails in a different way. The table below is arranged for working backward from a symptom to a layer. The mapping is the editors’ summary based on the behavior described in the guide and in SKILL.md.
| Symptom | Layer to suspect first | Behavior in the documents that supports it |
|---|---|---|
command not found |
Layer 2 (install, PATH) | Tests also look for the installed command with which and, if it is missing, suggest pip install -e . |
| “Cannot find the original program” | Layer 4 (backend) | The guide says to raise an error with installation instructions when the executable is missing |
| The project JSON has the changed value but the output does not | Between layers 3 and 5 (rendering gap) | The guide warns that project-level effects can silently drop out in a simple render tool |
| Exit code 0 but the file will not open | Layer 6 (verification) | Tests open the file and check the PDF start bytes or the ZIP structure directly |
Layers 1 and 2: the SKILL.md agents read and the JSON-output commands
Only the top two layers are visible to the agent. The SKILL.md in layer 1 is a document written so that an agent can learn how to use that CLI. Open the one for GIMP and you find a header with a name and description, tables by command group, example commands, and agent instructions such as “always use --json” and “after moving, drawing, changing blend modes or applying filters, check the exported result instead of trusting only the saved project state.” On April 18, every CLI’s SKILL.md was gathered into the top-level skills/ folder of the repository, and they are installed into an agent one at a time with npx skills add HKUDS/CLI-Anything --skill <name> -g -y.
Layer 2 is a command line built with Python’s Click. The guide insists that every command support --json and that running with no arguments should drop into an interactive REPL (invoke_without_command=True). One-line commands suit scripts and pipelines, and the REPL suits agent sessions that carry state forward, which makes it a dual structure. In the GIMP CLI source, errors also come out as JSON shaped like {"error": ..., "type": ...} with exit code 1, so an agent can read the kind of error as text and choose its next action. Agents find commands on their own with --help and which cli-anything-<name>. These two layers are the contract between the agent and the program, and so even in implementation order the guide says to build query commands (info, list, status) before mutating commands, and to give each mutating command exactly one logical operation.
Layer 3: state left in project files, and undo
The third layer is state. In the screen approach, state lives somewhere inside a window where the agent cannot see it, but this CLI leaves state in a named file. It is either the program’s native format (an ODF document, MLT XML, SVG) or, failing that, a JSON project file. The GIMP CLI handles the same state in three ways.
| Usage | Where state is kept | Undo |
|---|---|---|
| One-line command | Saved automatically to the project file when the run ends | A one-line command keeps no undo history |
One-line command + --dry-run |
Prints the result without saving to disk | Nothing is saved to begin with |
| REPL started with no arguments | Session memory, and the file on save | session undo, redo, history; SKILL.md states up to 50 steps |
The guide also has a rule for safety at the moment of saving. It uses an exclusive-lock pattern (_locked_save_json) that opens the file with r+, locks it, and truncates and writes the contents inside that lock, so no other process can intrude on the same file while it is being saved. This is a safeguard needed when several agents touch the same project.
GIMP’s draw text and draw rect are operations applied at render time, not at save time. So even when the project JSON contains the text, you cannot know the result until you export the image and look at it. This is what the guide calls the “rendering gap.” It is a warning that when a CLI that only edits project files produces output through a simple render tool, effects can silently drop out, and the guide’s remedies come in priority order. Rendering with the app’s own engine is best; failing that, translate the effects into the render tool’s syntax; failing that, hand over a render script for a person to run.
Layers 4 and 5: the name says GIMP, but Pillow draws the picture
The fourth and fifth layers are where the real program is called. The backend module in layer 4 finds the executable with shutil.which() and runs it with subprocess.run(), and it must fail clearly, with installation instructions, if the executable is missing. Layer 5 is the original program running without a screen, such as blender --background or libreoffice --headless. The guide states this as its first rule: render and export with the real program, and reimplementing the program’s features in Python is a counterexample. The example it gives is exactly “a Pillow-based image compositor that replaces GIMP.” The fifth of the README’s design principles likewise says the real program is mandatory with no fallback path, and that without the backend the tests must fail rather than skip.
Yet the first sentence of the GIMP SKILL.md says this CLI is built on top of Pillow. The document recommends GIMP for native batch rendering when it is available, but says that when GIMP is absent, or for layer compositing, rendering goes through the built-in Pillow path, and that for projects with drawing operations the Pillow path is the stable default even when GIMP is installed. The README’s backend column also varies from harness to harness.
| CLI | Backend the README lists | What to read from it |
|---|---|---|
| GIMP | Pillow + GEGL/Script-Fu | Uses the image-library path as well |
| Blender | bpy (Python scripts) | Renders with Blender’s internal Python |
| Inkscape | Direct SVG/XML manipulation | Edits the SVG file directly |
| Audacity | Python wave + sox | Combines the standard module with sox |
| LibreOffice | ODF generation + headless LO | Writes the document itself and uses LibreOffice only for export |
| OpenRefine | Local HTTP API | Keeps the program running and calls its API |
Knowing that the rule and the reality differ changes the interpretation. A CLI named GIMP does not mean the output came from the GIMP engine, so for important work it is safer to run it in an environment where the original is installed and compare. Most CLIs require the original program to be installed separately, and the requirement is written in the requires field of the registry entry (Blender 4.2 or later).
Below is a usage scene for the LibreOffice CLI from the README. The first three commands only edit report.json; it is at the fourth that LibreOffice runs without a screen and produces the PDF.
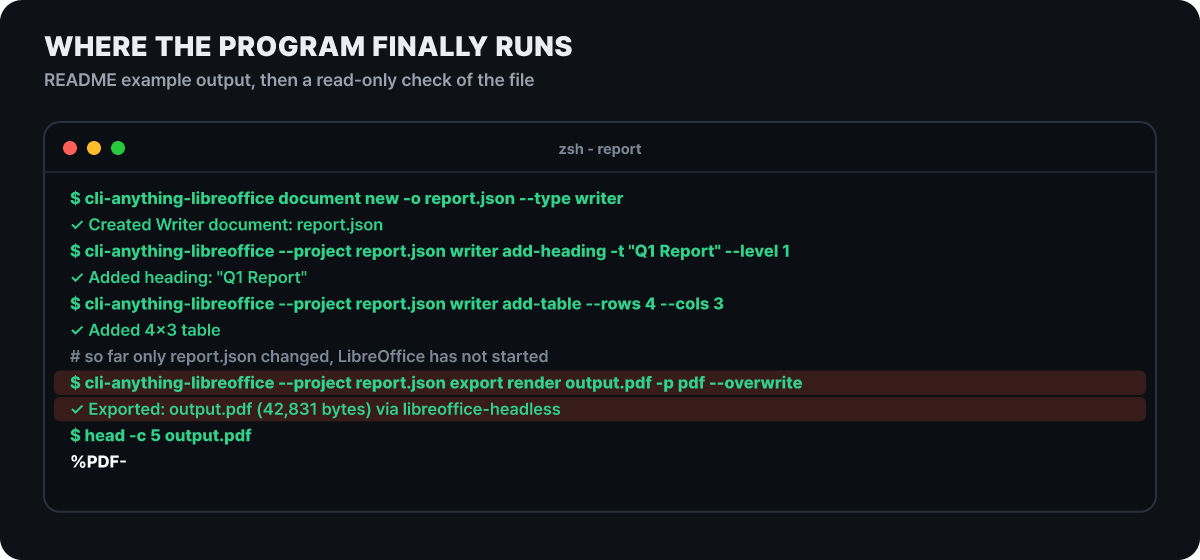 Figure 3. The two highlighted lines are where layer 5 did its work, and the first three commands change only layer 3’s project file
The last two lines are the first step of layer 6. Even when the export message reports a file size, that statement alone cannot tell you whether the PDF is sound, so a read-only command is used to look at the first five bytes of the file directly.
Layer 6: what a passing mark measured
The sixth layer is the test that opens the output and checks it. The README divides tests into four tiers. Unit tests check individual functions with synthetic data; end-to-end (e2e) tests check that project file generation is correct (the ZIP structure of ODF, MLT XML, the SVG format); end-to-end tests call the real program and inspect the result (the %PDF- start bytes, a PNG rendered by Blender); and tests call the installed command through subprocess. The same pass means different levels of trust depending on which tier it came from.
Picking CLIs with many tests and CLIs with no end-to-end tests from the README’s 30-row test table and splitting them into unit and end-to-end tests gives different shapes.
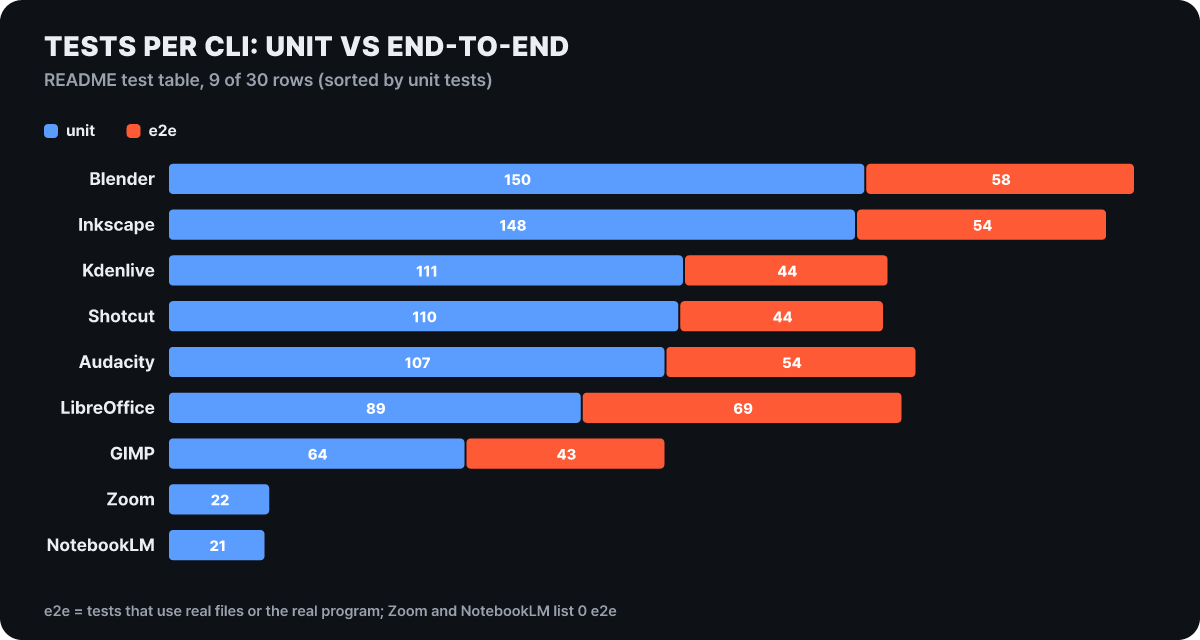 Figure 4. Total test counts and the share of end-to-end tests vary widely between CLIs, and the Zoom and NotebookLM rows list zero end-to-end tests
Blender has the most tests at 208, but only 58 (28%) are end-to-end, while LibreOffice has 69 end-to-end tests out of 158 (44%). Zoom has only 22 unit tests. Few tests are not bad in themselves; the point is to look first at what the numbers actually tested.
The numbers inside the README do not agree with each other. The badge at the top says 2,461 and the last row of the table says 2,464, but adding up the table’s 30 rows directly gives 2,622. Outdated phrases such as “2,280+ tests” and “18 apps” remain in the middle of the text. Contrary to the principle that tests must fail when the backend is missing, the table lists skipped tests (2 for WaveTone, 3 for Eth2 QuickStart, 9 for Unreal Insights, 1 for Joplin). It is better to read each CLI’s share of end-to-end tests than the totals. To check for yourself, run the command below in a copy of the installed CLI’s folder. It runs the tests that call the installed command for real and prints the paths of the files the end-to-end tests created. Because these tests run the original program to create files, do not run them in the original folder.
CLI_ANYTHING_FORCE_INSTALLED=1 python3 -m pytest cli_anything/<name>/tests/ -v -sRead the technical report’s numbers the same way. Based on a registry snapshot, the report presents 65 harness CLIs, 18 external CLIs and 61 companion skills, along with an observation that 87.8% of CLI-Hub calls come from agents (7.19 times the human calls). These values show the scale and makeup of usage, and the report does not give the collection period or the number of calls. Take them as circumstantial evidence that agents use these tools, not as evidence of a success rate.
The factory that makes the layers: seven generation steps
A person does not write the six layers. The generator is not a separate program but a plugin attached to the agent, and the agent does the actual work by following a standard guide called HARNESS.md. In Claude Code, two lines, adding the marketplace and installing, are all it takes.
/plugin marketplace add HKUDS/CLI-Anything
/plugin install cli-anything
After installation you use four commands. /cli-anything <path or repository> builds a harness through all seven steps. /cli-anything:refine <path> [focus] analyzes feature gaps and adds commands, tests and documentation, and it can be run many times without deleting what already exists. /cli-anything:test runs the tests and updates TEST.md, and /cli-anything:validate verifies conformance to the HARNESS.md standard. Because the README lists, among its limitations, that a single generation often fails to cover all features, refine is part of the official flow.
The README speaks of seven steps, and the guide has an additional step 6.5 between steps 6 and 7, where SKILL.md is created.
- Analysis: Scan the source and map which internal function each screen action corresponds to. Find the backend engine, the data model, any existing command-line tools and the undo system.
- Design: Decide the command groups, the state model and the output format, aiming to support both the REPL and one-line commands.
- Implementation: Build up in this order: data layer, query commands, mutating commands, backend connection, export, session, REPL.
- Test planning: Before writing code, record the test list and realistic task scenarios in
TEST.md. - Test writing: Implement unit tests with synthetic data (
test_core.py) and end-to-end tests that use real files and programs (test_full_e2e.py). - Documentation: Fill
TEST.mdwith the test results, the pass rate and the scope not covered. - Packaging: Create
setup.pyand install onto the PATH. TheSKILL.mdmade in step 6.5 becomes the entry point agents find and use.
What stands out is the order that makes you plan tests before code. It means layer 6’s verification is not tacked on at the end but settled at the design stage. When it finishes, a folder of the following shape is left behind.
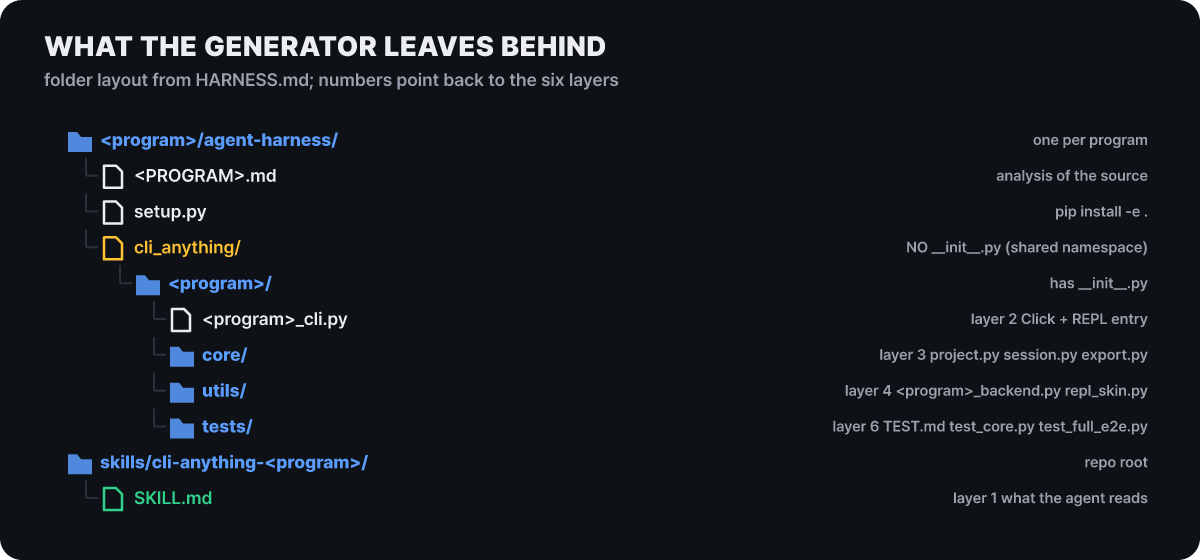 Figure 5. Each folder corresponds to one of the six layers above, and the yellow marks are the spots where
__init__.py is deliberately left out
Leaving out __init__.py directly under cli_anything/ makes it a PEP 420 namespace package, so that many CLIs can be installed together under the same cli_anything.* name without conflict. The guide’s list of pitfalls also includes an item on frame rates that are not integers, such as 29.97 frames per second: time calculations accumulate error, so use round() rather than int() together with a tolerance of ±1 frame. Install and check a finished CLI like this.
cd gimp/agent-harness && pip install -e .
which cli-anything-gimp
cli-anything-gimp --json project new --width 1920 --height 1080 -o poster.json
Besides Claude Code, the README has separate install procedures for Pi, OpenClaw, Cursor, Codex, Hermes, Reasonix, Qodercli and GitHub Copilot CLI, and OpenCode, Codex, Hermes, Reasonix and Goose are marked as experimental support. Generating with Claude Code on Windows requires bash, so you need to install Git for Windows or WSL, and the README warns that without it cygpath: command not found may appear. The default input is source code. For a program with no source, the README recommends supplying an open-source alternative that does the same job, and explains that feeding in the documentation or SDK of scattered web services will organize them into one command group. According to the limitations section, if only a compiled binary exists and decompiling is needed, quality and coverage drop sharply. The README also states that a trustworthy harness needs a top-tier model (for example Claude Opus 4.6, Claude Sonnet 4.6, GPT-5.4) and that smaller models may produce incomplete CLIs.
cli-hub: fetching layers that are already built
Before generating one yourself, it is faster to check the registry first. The entry point for people is the package manager cli-hub, and the latest cli-anything-hub on PyPI is 0.4.1 (uploaded July 9 UTC).
pip install cli-anything-hub
cli-hub search image          # search by keyword
cli-hub info gimp             # check the contents before installing
cli-hub install gimp          # install
cli-hub launch gimp           # run
The commands are list, search, info, install, update, uninstall and launch, and the reason to go through info before installing becomes clear once you see what a single registry entry holds. This is the Blender entry in registry.json.
name:        blender  (1.0.0, category 3d)
description: modeling, animation and rendering with blender --background --python
requires:    blender >= 4.2        # install the original program separately
install_cmd: pip install git+https://github.com/HKUDS/CLI-Anything.git#subdirectory=blender/agent-harness
entry_point: cli-anything-blender
skill_md:    skills/cli-anything-blender/SKILL.md
The registry is split into two files. The harness list registry.json has 79 entries (updated June 19), of which 66 install from subfolders of this repository. public_registry.json, which collects third-party and official CLIs from external developers, has 24 entries (updated Aug 20) and splits by install method into 11 npm, 6 pip, 2 brew, 1 uv, 1 go, 1 script run and 2 with no install command. To let an agent choose a CLI on its own, install the meta skill.
npx skills add HKUDS/CLI-Anything --skill cli-hub-meta-skill -g -yThe README says this skill is used by agents that understand skill formats, such as OpenClaw, Nanobot, Claude Code and Codex. The project’s current status is 86 open issues, 138 open pull requests, and the latest release v0.4.0 (June 25), with the last commit on Sep 22 (UTC). v0.4.0 added the CLI-Matrix command family for bundling the installation of several CLIs, along with about 30 new CLIs. The license is Apache-2.0.
A case of fitting layers onto a game with no outside door
When the real program is not open to commands, you have to cut a door before you can build layers. Slay the Spire II, which the technical report cites, is such a case. A C# bridge running inside the game exposes state over HTTP on loopback port 15526 within the same computer, and it limits to at most 10 the requests it takes from its queue when the game processes one frame. The harness built on top organizes the game state into 15 decision states (combat_play, card_reward, map_select and so on), passes through 24 action verbs for single-player play, and exposes them as 28 Python CLI Click commands (play-card, choose-map, proceed and so on).
The report explains that one meaningful command (play-card) gathers countless input records that differ in cursor path, timing and resolution into one stable action. It amounts to adding one more layer, a bridge at layer 0, in front of the structure from layer 1 to layer 6.
Holes that open at each layer
Strings the agent supplies travel unchanged from layers 1 and 2 down to layer 4, so security holes appear at every layer too. The repository’s SECURITY.md states the threat model in one sentence. Unlike ordinary CLIs, where a person reviewed each command, an agent builds and runs commands on its own from untrusted input such as user prompts, uploaded files and other agents’ output, and a prompt-injected agent can pass strange arguments to the real program. Mapping the document’s five attack surfaces to layers gives the following (the layer mapping is the editors’ summary).
| Layer | Attack surface | Mitigation the document lists |
|---|---|---|
| 2 | Subprocess arguments: malicious codec names, paths or filter values are passed to melt, ffmpeg and gimp | Validate against an allowlist before the call (kdenlive and shotcut use a codec allowlist) |
| 3 | XML and SVG content: user text goes into MLT XML, SVG and Draw.io files | XML escaping, ElementTree automatic escaping |
| 3 | Path traversal: an agent-chosen output path writes to the wrong place | os.path.abspath() normalization |
| 3 | Credential exposure: API keys saved in plaintext config files | File permission 0o600 |
| 4 | Script-Fu injection: user strings get mixed into GIMP batch scripts | Apply an escape function (_script_fu_escape()) |
These risks did not stay theoretical. The README news records a fix for an injection vulnerability in the GIMP Script-Fu path on March 14, a switch to defusedxml for parsing XML, SVG, ODF and others on May 19, and on May 21 a fix that blocks path traversal and symbolic-link escape in the Sketch CLI’s token file handling. The harness developer rules are likewise summarized as: no shell=True, allowlist validation of every subprocess argument, escaping user content before putting it into scripts, path normalization, and never printing keys in error messages. Whether these rules were kept in the code the agent wrote is exactly the pre-install checklist, and you can skim a generated folder with read-only commands.
cd gimp/agent-harness
grep -rn "shell=True" cli_anything/ || echo "no shell=True"
grep -rn "subprocess" cli_anything/*/utils/ cli_anything/*/core/
sed -n 1,40p setup.py
head -60 cli_anything/gimp/tests/TEST.md
Install methods in the public registry vary widely. Of the 24 entries uploaded by external developers, 1 pipes a script fetched with curl straight into bash, and 2 have an empty install command. Before installing, read the source and install method with cli-hub info <name>, and run any command with write access (deleting or overwriting files, calling external services) on a copy or a test account first.
If you find a vulnerability in a generated CLI, SECURITY.md says not to open a public issue but to use GitHub’s private vulnerability reporting (the Security tab) or contact the maintainers directly. The goals are to acknowledge receipt within 48 hours and to fix critical problems within 7 days.
Other routes to the same problem
A command-line entry point is not the answer for every program. If a program already has a good official command line or API, use that, and there is no reason to go through CLI-Anything. If the program has opened an MCP server, there is a route to attach it directly as a tool call. The harness guide also has an MCP backend pattern, which can continue toward wrapping a program that has a server in a CLI once more, and the README’s Safari CLI (based on safari-mcp) is such a case. For how MCP is structured, see What Is MCP and Why Is Everyone Adding It? A Primer, and for a real case of attaching a browser to an agent through MCP, see Chrome DevTools MCP lets agents open Chrome and test it.
The place where the screen approach remains is also clear. The report admits as limitations programs whose state is closed off from outside view, features that cannot be carried over into commands, cases where rendering will not work without a screen, and creative decisions that must be judged by eye. If a program keeps its state in files and can render headlessly, the same task is repeated many times, and the results can be checked by file format or pixel values, a command-line entry point fits; if not, the screen approach or MCP fits. Whether the program you use is in the registry takes just two lines, cli-hub search and cli-hub info, and the result tells you how many of the six layers have already been built.