Cherry Studio runs OpenAI, Anthropic and local models
Cherry Studio mapped by data direction: entrance (providers, imports), inside (chat, knowledge bases, agents) and exit (API gateway, channels, backups).
You solved a problem in Claude yesterday and want to ask another model today, but the moment you start copying the conversation over, it becomes a chore. Every service has its own API key, the keys are scattered across a notes file, shell settings and each tool’s environment variables, and to let a service read your company documents you have to upload the files again each time. Your history is locked inside each service, with no way to search it later. Cherry Studio is an open-source desktop client that tries to gather all of this into one app. It runs on Windows, macOS and Linux, and there are separate mobile apps.
The values checked on GitHub on 2026-10-27 UTC are 52,999 stars, 5,132 forks and 414 contributors. The repository was created on May 24, 2024, and the latest release is v2.1.8, published at 08:56 on October 26. With this many features, reading the feature names in order doesn’t tell you what lives where. This article sorts the features by where data enters the app, where it stays inside the app, and where it leaves the app, reads them as a map, and points out what to check in each zone before you switch it on.
Dozens of features, mapped by data direction
The official docs’ “advanced feature map” starts from “what do you want to do” and picks an entry point for you, rather than listing features. This article goes one step further and regroups the same features by data direction. In the figure below, the left is the entrance where keys and material come in, the middle is the inside with chat, knowledge bases and agents around the model switcher, and the right is the exit that hands models and agents out of the app.
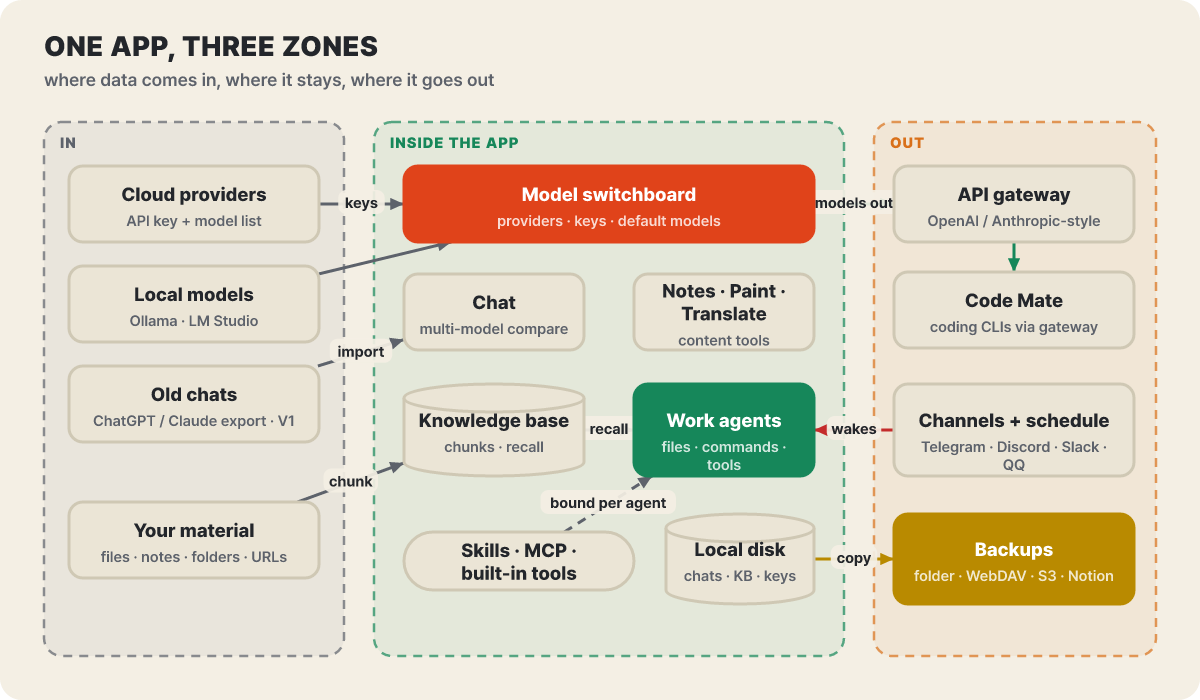 Figure 1. The app’s features split into three zones. Arrows show the direction data moves
The places where the most arrows gather in the figure are the model switcher and the agent. The providers you register in the model switcher are used by chat, agents and the gateway alike, so how you registered a single key decides the safety of the other zones. The agent, in turn, is the only place that wakes up on messages arriving from outside (channels, schedules), which makes its permission settings important. The app’s settings screen splits into five groups that resemble this map.
| Settings group | What it holds | Place on the map |
|---|---|---|
| Models | Model providers, default model, local models (embedding and OCR models that run offline), API gateway | Entrance and exit |
| Tools | MCP, skills, web search, document processing, OCR | Inside |
| Preferences | General (proxy, developer mode), appearance, notifications, data (backup), archive, usage statistics | Exit (backup) |
| Efficiency | Channels, scheduled tasks, shortcuts, quick assistant, selection assistant | Exit and inside |
| System | Runtime dependencies (uv, bun and others), version info and feedback | The app itself |
Entrance 1: seven provider types and entering keys
There are more than 60 connection templates, but the app handles providers as seven types by protocol. Once you know the types, you can attach services that have no template.
| Type | Compatible protocol | Typical examples |
|---|---|---|
| OpenAI-compatible | /v1/chat/completions | OpenAI, DeepSeek, SiliconFlow, OpenRouter, most relay services |
| Anthropic-compatible | /v1/messages | Anthropic, CherryIN and others. Cherry Agent needs this type |
| Gemini | Google AI Studio·Vertex | Gemini, Vertex AI |
| Bedrock | AWS Bedrock SDK | AWS Bedrock |
| Azure OpenAI | Azure OpenAI Service | Azure OpenAI |
| Local inference | An HTTP service on your own computer | Ollama, LM Studio, GPUStack, OpenVINO Model Server |
| Special gateway | Vendor-specific protocol | NewAPI, OneAPI, AiHubMix, DMXAPI and others |
Attaching a provider takes four steps. In Settings, pick the provider under model providers, enter the API key, add chat, embedding and vision models with “model sync”, and if needed test the connection with any one chat model using “model check”. Then pick the model you just added on the chat screen and send a first message; once a reply arrives, the basic setup is done. The API address defaults to the provider’s official address, adding # at the end of the address makes it use a fixed path, and you can also register several keys to rotate through.
Many people spend surprising time choosing an installer. Windows has a regular (x64) build and an ARM build, macOS has DMGs for Apple Silicon and for Intel, and Linux has .deb, .rpm and .AppImage. If you can’t tell which chip you have, check with one read-only command in a terminal.
uname -m
# x86_64 means the x64 build; aarch64 or arm64 means the ARM64 build
There are two ways to use it without a key. One is to run models on your own computer with Ollama or LM Studio and connect them as the local inference type. The other is the developer’s built-in model service; its requests pass through the developer’s relay service, so it is covered separately in the data table in the backup section. Start with one provider that passed the model check and add the others one at a time as you use them, which makes it easier to tell where an error comes from.
Entrance 2: bringing in old chats and V1 data
When you first sit down at a new app, the thing you miss most is the conversations you’ve already built up. Open “Import external app data” under Data in Settings and it reads a ChatGPT or Claude export file (conversations.json). For Claude, request a data export from the privacy menu in Settings, unpack the file that arrives by email, and pick the conversations.json inside. Claude conversations come in with text, thinking, tool calls and tool results together, and for both ChatGPT and Claude the conversation branches are kept. Images and attachments do not come over.
If you were already using Cherry Studio V1, the situation is different. V2 is not an overwrite update but a version with a changed data structure, and knowing the order of dates makes the migration procedure easier to follow.
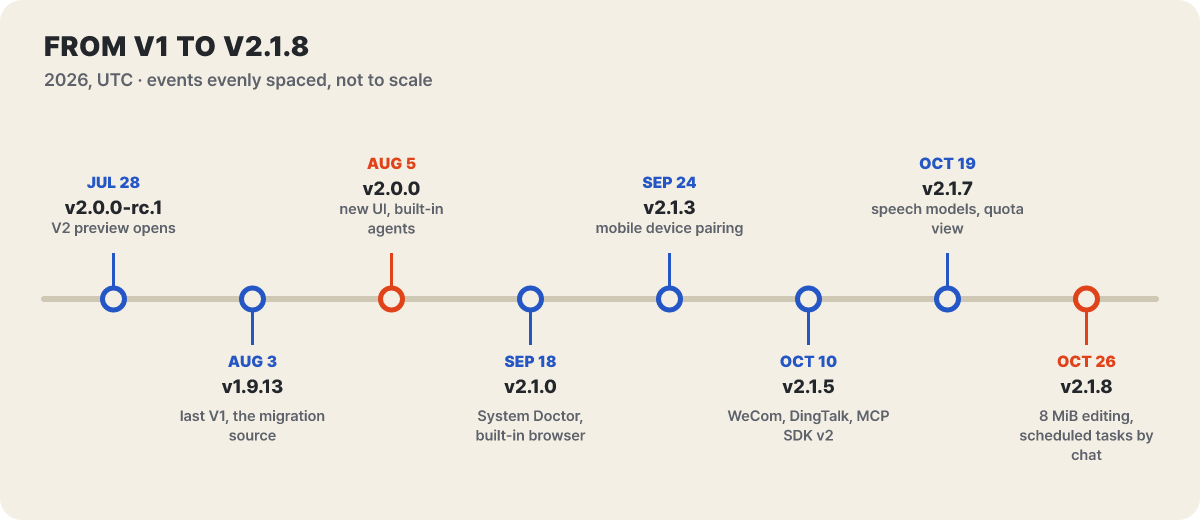 Figure 2. The last V1 version, 1.9.13, came out two days before the V2 stable release (August 5). Intervals are not to scale
In the 82 days from the V2 stable release to v2.1.8, 22 stable releases came out. By month that is 10 in August, 8 in September and 4 in October (through the 26th) (our own count). At this pace, V1 users have only one path to follow. 1.9.13 is the starting point for migration. V1 data moves to V2 in one direction only; you cannot turn data made in V2 back into V1, or restore backup files from one version into the other.
V1 → V2 order. Update V1 to 1.9.13 and run it normally once, make a full backup with “Compact Backup” turned off, quit the app completely and copy the whole V1 data folder somewhere safe, and only then install V2. What the migration wizard reads is not the backup ZIP but the current V1 data folder. After migrating, check your providers, keys and default model, the agent tool permissions, and the knowledge base connections. Anthropic OAuth login is not migrated, so register it again with an API key. “Re-migrate” permanently deletes the current V2 data and imports again from V1, so use it only when the migration failed, and only after making a full backup of the current V2 data.
Chat zone: the same question to three models
The first door of the inside zone is chat. Turn on multi-select in the model picker of the input area and choose the models to compare; the question goes out to each model separately, and the answers sit side by side.
Here is a draft of our new subscription pricing policy. Evaluate it from three angles: feasibility, risk and cost.
An example made by the editorial team. Pick 3 models and 3 requests go out, and the 3 responses are shown side by side on one screen.
From the three answers, pull out only the factual claims that differ and put them in a table.
The core of the usage the docs recommend is the order. First write the goal, the material, the constraints and the output format you want into the question, and only then add models, and only when you need a comparison. Multiple models don’t fill the gaps in a question for you; they only widen the differences in the answers. The docs add a note that if you only ask “which is better”, you end up picking the longest answer, so compare whether the facts agree, whether the assumptions are stated, and what is missing.
There are also clear cases where adding models is not better. To look up one concrete fact or polish a short text, a single model keeps the screen and the bill simple. And a question that contains something you must not send to several providers goes to three places the moment you pick three models. For a long conversation, check the context usage, summarize, and move on to a new topic; while waiting for an answer, you can queue your next question in the message queue. If you need to keep working on a file or code, download it from the answer’s artifact preview or hand it off to a new task.
Document zone: the order in which a question becomes an answer through chunks
A knowledge base turns files, notes, folders and web pages into a set of material you can look up again and again. Not all material needs to go into a knowledge base. The docs sort the cases like this.
| Situation | Recommended approach | Why |
|---|---|---|
| Looking up company rules, product manuals or project material repeatedly | Knowledge base | The material must be reused and cited reliably |
| Analyzing one attached file once | Upload straight into chat | No indexing or management needed |
| Still organizing the material | Organize in notes first | Content not yet final is not treated as an official answer |
| Long-term automated processing | Build a knowledge base and connect it to an agent | The agent keeps using the same scope of material |
Unpacked by actor, here is how a single answer gets made. Watch the 4th arrow.
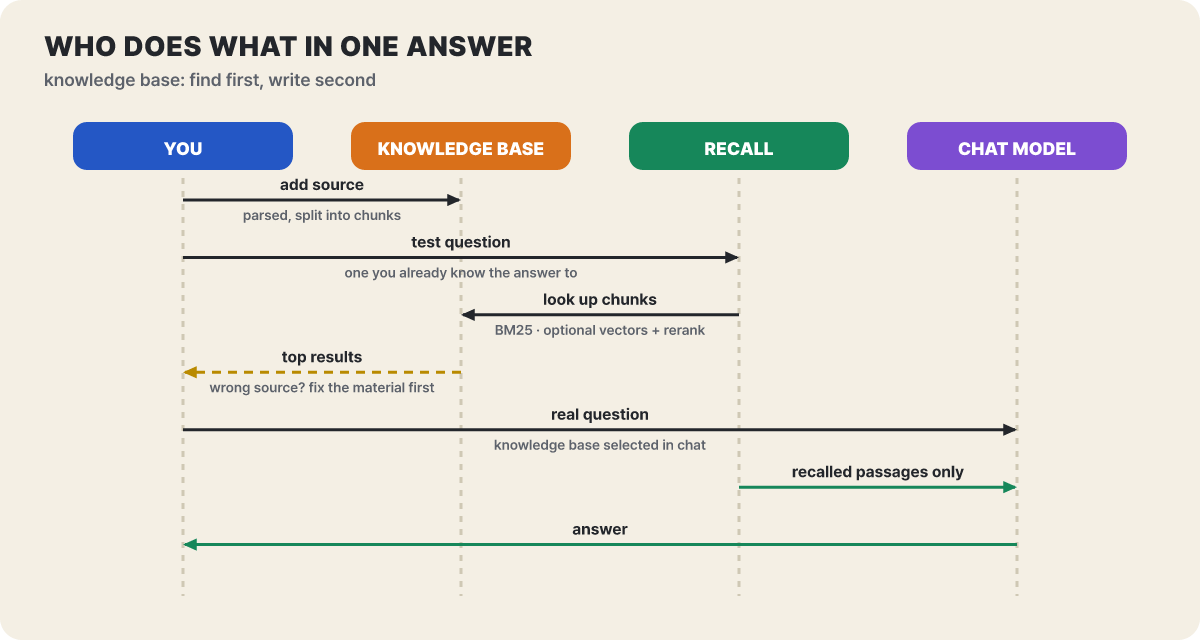 Figure 3. The chat model writes its answer seeing only the chunks that search hands over. If the upper result is wrong, swapping the lower model does nothing
If the test result at the 4th arrow is wrong, fix the material and the settings before swapping in a better model. The chat model writes its answer from only the chunks that search found, so if the key sentence is not in a chunk, no model can fill the gap. The terms the official docs define follow this same order. The small pieces the material is cut into are chunks, and the process of finding the chunks that fit a question is recall. The embedding model, which matches text that means the same thing in different words, and the rerank model, which re-sorts the candidates, are both optional, and if you turn off the embedding model, BM25 keyword search takes the lead.
- In the left navigation, create a new knowledge base and name it "topic + purpose". Leave the embedding model on "Do not use" at first.
- Under Add data source, pick the entrance that fits the material among file, note, folder and URL. Don't throw in a whole unrelated folder.
- When processing finishes, open one or two items and check that the text and chunks have no broken characters, missing pages or scrambled order.
- Enter 3 to 5 real questions whose answers you already know into the recall test and check that the right source appears near the top.
- If it is stable, pick this knowledge base in the chat input area, or for long-term work connect it on the agent edit screen.
An example made by the editorial team: three travel-policy documents. Create a “Travel policy” knowledge base from three documents on lodging, transport and approval, and start without an embedding model. In the recall test, use the way people really ask, such as “What is the lodging limit” and “Who approves expenses above a certain amount”, not the document titles. The pass criteria are that the correct policy source rises to the top for each question, and that a single chunk that comes up contains both the condition and the conclusion. Attach an embedding model only when conversational questions fail to match the policy wording. If you use a cloud embedding model, its cost and data handling follow that provider’s terms.
Two things are often missed in operation. Changing the chunk-splitting settings does not automatically update material you have already added, so run Re-index and test again with the same set of questions to get a fair comparison. And the “import complete” mark only means processing has finished, not that the result is complete.
Agent zone: two run modes, five permissions, four parts to attach
Work in the left navigation is a different system from chat assistants (role presets). It calls tools on its own, reads and writes files in the working folder, splits a goal and hands pieces to sub-agents, and runs long commands in the background. An agent is created in four steps (basic info, system prompt, skills, knowledge base), and the run mode you pick in the first step cannot be changed after creation. The Claude Agent mode is the default choice when unsure: it lets you set the main model, planning model and small model separately, supports five permission modes and a heartbeat (periodic check). The Pi mode is a lighter one that uses a single main model, has no “Plan Only”, and when newly created defaults to “Approve for Me”.
The permissions run from most cautious like this.
| Mode | Behavior | Fits |
|---|---|---|
| Ask Before Acting | Asks before editing files or running commands | The starting point. Real project folders |
| Plan Only | Does not change files; runs only reading and vetted commands | Reviewing options, pre-release checks |
| Auto-accept Edits | Edits files freely and asks about commands | Reversible document and code cleanup |
| Approve for Me | Skips routine approvals, with safety checks blocking risky actions | Work with clear boundaries |
| Full Access | Skips permission checks | Only isolated, recoverable environments. Can delete files and reach the network |
If the model doesn’t support “Approve for Me”, it may ask every time. The docs advise starting with “Ask Before Acting”, setting only the one folder you need as the working folder if the task touches files, and moving to a less hands-on mode only after the method has stabilized.
There are four parts that widen what an agent can do. They solve different problems, so you don’t need to install all of them.
Browser, files, shell, search, memory, schedules, sub-agents. The tool that converts documents to Markdown cannot OCR scanned PDFs
The boundary of private material the agent can search. If not connected, the search tool does not appear in the list
A bundle of procedures, formats and standards to follow. Does not connect to external systems, and may contain scripts
External tools and data such as databases, browsers and business systems. Registered as a local command (standard I/O) or a remote address (SSE, streaming HTTP)
The place to get stuck is turning them on. Installing and connecting skills and MCP in Settings does not mean every agent uses them; you have to turn them on separately in the skills, MCP and knowledge base tabs of the agent edit screen, and they apply from the next message. If a server is connected but its tools don’t show, check in order whether it is bound to the agent, whether the tools are switched off, and whether a permission request is waiting. Skills are added by creating them from an agent, searching online (including GitHub SKILL.md links), finding them on this computer, or importing locally (ZIP or folder), and before saving the docs tell you to check the detail screen for scripts and for required tools and accounts. A skill or MCP server of unknown origin is best treated as external code that inherits the agent’s permissions as they are.
Memory is tied to the agent, not to a task or folder. It is for remembering lasting rules such as “use polite register in outward-facing writing and avoid exaggerated headlines”, and the docs warn against putting in passwords, API keys or private information. Systematic document search is the knowledge base’s job, not memory’s. When an agent seems stuck, look at the status panel on the right first. It shows whether it is waiting for a permission approval, whether a background command is still running, whether a sub-task failed, and whether the provider is retrying.
Exit 1: the API gateway and Code Mate
Once the agent becomes useful, you start wanting to use this app’s models from other programs too. Turn on the API gateway in Settings and the models you have configured open on your computer as an OpenAI- and Anthropic-compatible HTTP API. It is also an internal service the agent needs in order to run, so if you only use Cherry Studio agents, you just press “Enable and start”, and there is no URL or key to copy elsewhere.
There is an order for letting a local script call this API. The port can be changed only while the gateway is stopped (if another program uses that port, it won’t start), and once you start it and the status changes to “Running”, the URL and the API docs entry point appear. External programs connect with an Authorization: Bearer <API key> header, and at first you test connection and generation separately, with a model list request and one short sentence. The gateway does not provide models; it only turns the connected providers into a compatible interface, so at least one provider must exist first, the cost is billed to the actual model provider, and you can see the records under usage statistics in Settings.
The open range is the range of risk. Opening it for access from other devices widens the exposure. You have to check the network listening range, the firewall and access control yourself, so avoid opening it to the LAN or the internet for debugging convenience and keep it local-only. Don’t leave the key in repositories, issues, logs or tutorial screenshots. The finish line is confirming that, after you stop the gateway, clients can no longer call it.
Another exit that uses the same gateway is Code Mate. It is the screen for installing, configuring and running terminal coding tools; the list includes Claude Code, OpenAI Codex, Antigravity CLI, OpenCode, Qwen Code, Kimi Code, Qoder CLI, GitHub Copilot CLI, Pi, Hermes Agent, OpenClaw, DeepSeek Harness and MiniMax Code, and the visible entries change with updates. For a CLI that needs a model service, only compatible providers are listed, and if you pick “Unified Gateway (any CLI, all models)”, the CLI goes through the Cherry Studio gateway and uses any model you have configured. A CLI that uses its own account login can keep that login method as it is. Claude Code has two model modes. “General” uses the same model for every request, while “Detailed” sets a model separately for each role (Fable, Opus, Sonnet, Haiku and sub-agent), and roles left blank follow the main model.
The installation source of a tool falls into three kinds.
| Source | What Cherry Studio does | Who manages it |
|---|---|---|
| Cherry Studio managed | Installs, updates and removes that copy | Code Mate or the dependencies screen |
| System PATH | Detects it and uses it as is, without overwriting | The original package manager |
| Built into the app | Uses it as is; system removal is not provided | Cherry Studio updates |
Make the first command after launch a read-only one. You check that the account, model and working folder are right, and only then allow file edits. It is also worth pointing out here that this runs in the opposite direction from MCP. MCP is the road that brings external tools into Cherry Studio, while the API gateway is the road that hands Cherry Studio’s models out to other programs.
Exit 2: the order in which messengers and schedules wake an agent
Channels attach an agent to a messenger. The platforms the docs cover are Telegram, Discord, Slack and QQ, and the release notes separately list WeCom and DingTalk channels (v2.1.5) and a group-reply option for the Feishu bot (v2.1.8, replies only when @mentioned). Each platform needs different credentials. Telegram needs a bot token and chat ID, Discord a bot token and a channel or DM ID, Slack a bot token, an app token (Socket Mode) and a channel ID, and QQ an app ID and client secret.
Automation has four components, and each does a different job. The agent does the work, the channel receives outside messages and sends notifications, the scheduled task runs the agent at a set time, and the heartbeat (30 minutes by default) checks in-progress work at intervals. “Is there new news today” fits the heartbeat, and “a weekday morning schedule report” fits a scheduled task, which leaves an execution plan and logs. Don’t set it all up at once; keep to this order.
- Manual runIn Work, until results are stable
- Connect a channelBot token, dedicated agent, dedicated folder
- Limit allowed targetsTest accounts and group IDs only
- Create a scheduleRun it once yourself and check the log
An outside message runs inside the folder where the agent works, so instead of a home folder mixed with personal files, point it at an emptied dedicated folder. If the allowed-target ID field is left empty, depending on the platform every sender may be allowed, so at first enter only a test account. If you are unsure of the format, send /whoami to the bot.
/whoami
(Editorial example) The ID of this conversation comes back as a number or string in the platform's format. Put that value in the allowed-target field.
The permission default is "inherit agent settings". For public groups or rooms with many people, keep it stricter than that, and Full Access is not recommended.
If a channel does not appear in the notification target list of a scheduled task, first send the bot a direct message on that platform so the chat ID gets recorded. From v2.1.8 you can also create a scheduled task by talking with an agent, instead of creating a new task in Settings. When one fails, look at that task’s execution record first so you don’t misread “not delivered” as “not run”.
Exit 3: what is inside a backup file
The last exit is the road where the data itself leaves the app. A full backup contains the conversation history and topics, assistants and presets, knowledge bases (including vector data), notes, drawings, files and attachments, preferences, and the provider settings and API keys. Turning on the Lite (slim) backup switch skips large data files such as images and knowledge bases, so it is smaller and faster, but either way you treat the backup file as a secret file.
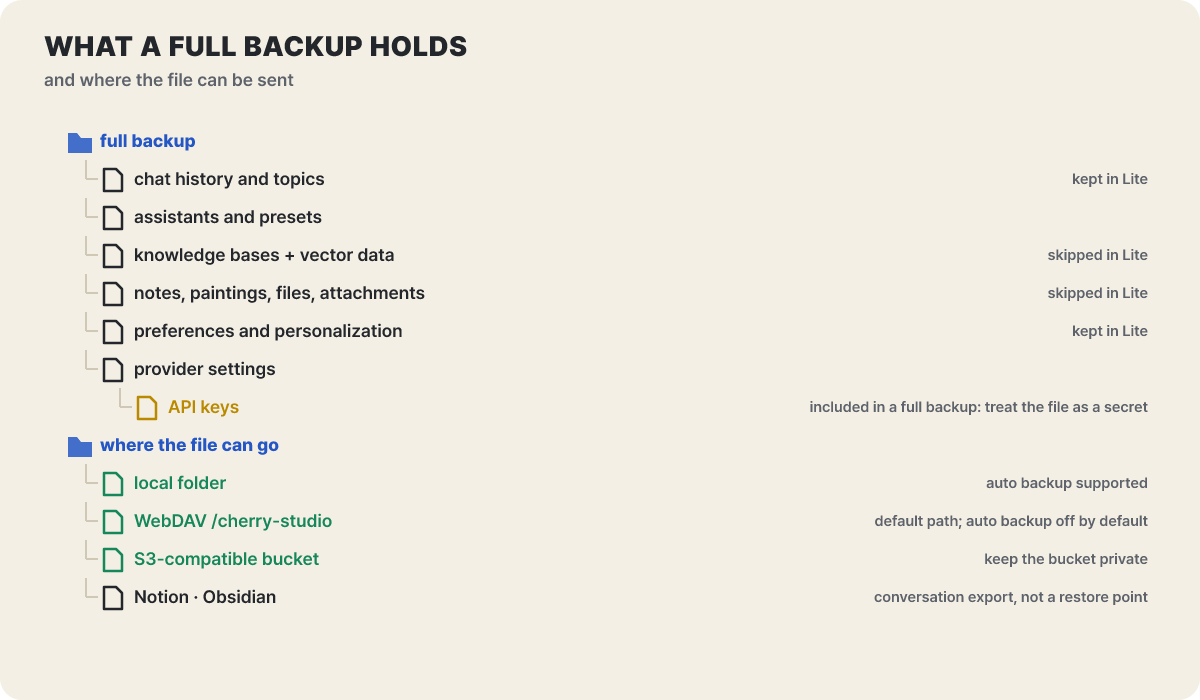 Figure 4. A full backup includes the keys. A Lite backup skips data files such as images and knowledge bases
Each storage location has different defaults, so they are worth reading once before you turn them on.
| Storage location | Defaults and tips |
|---|---|
| Local folder | Pick a backup folder and it supports automatic backup and backup file management. An external drive works too |
| WebDAV | Default path /cherry-studio, automatic backup off, maximum number of backups unlimited. If the server does not support chunked upload, turn off stream upload, and allow a self-signed certificate only for a server you run yourself |
| S3-compatible storage | Needs endpoint, bucket, region and access key. The docs stress keeping the bucket private for reading and writing. For Cloudflare R2, the region is auto |
| Notion·Obsidian | An integration that exports conversations for archiving. Not a restore point |
Automatic backup runs at intervals from a few minutes to 24 hours, and you can also use it to move between devices by backing up on computer A and restoring on B. Beyond backups, where the app sends data, combining the privacy policy (revised August 20, 2026) and the data settings docs, comes to the following.
| Data | Default behavior |
|---|---|
| API keys, conversation history, knowledge bases | Stored locally on your device. The developer states it does not collect them |
| Requests to the providers you set up | Connect directly from your device to that provider’s server. They do not pass through the developer’s servers |
| Requests to the built-in model service (models used without a key) | Pass through the developer’s relay service. Stated as not stored after the request is processed |
| Usage statistics and error logs | Anonymous information is collected by default. Can be turned off under Settings → Data settings → Privacy settings |
Data settings also has buttons that cannot be undone. Choosing “V1 legacy data” in Clear cache permanently deletes the old V1 conversations and settings with no way to recover them, and “Reset app data” erases conversations, assistants, knowledge bases, files and settings and restarts the app. They are not everyday troubleshooting tools, so make a full backup first before running them.
- Create a dedicated key with a low usage limit for each provider and register that
- Treat the backup file as a secret file that contains keys, and don't pass it through shared folders or messengers
- Keep the S3-compatible bucket private, and allow a WebDAV self-signed certificate only for your own server
- Open only the folders an agent needs and start with "Ask Before Acting"
- Allow only test account and group IDs in channels, and keep the gateway local-only
The range of use that AGPL-3.0 divides
The Community Edition is AGPL-3.0, and the repository states that commercial use is also allowed if every condition is met. AGPL is a strong copyleft license that creates an obligation to publish source even when you serve a modified version over a network. It is usually no obstacle for an individual installing it for personal use, but a team that puts the code into its own product or offers a modified version as a service needs a legal review. This article is not legal advice but a summary of the conditions the repository states.
If you want to roll it out centrally to a whole team, two routes come before modifying the source. There is an Enterprise Edition with central model management, shared knowledge bases, employee access control and private deployment, and for a commercial license that exempts you from AGPL obligations, the repository tells you to contact the developer (bd@cherry-ai.com).
What to read after this tool
Since Cherry Studio gathers three zones into one app, this site has articles that go deeper into each zone. On the entrance side, the Unsloth Desktop article covers running a model on your own computer and attaching it to a coding agent, and the LLM routing article covers sending easy questions to cheaper models instead of an expensive one. When attaching external tools on the agent side, read the MCP primer that explains the structure first, and before picking a server from a recommendation list, the roundup of archived MCP servers is worth checking. The SkillSpector article covers the checks to run before installing a skill of unknown origin.
Someone who only uses the latest features of a single service doesn’t need Cherry Studio, since that service’s official app supports its features first. Someone who only does development work is better served by a terminal coding agent, which is more direct, and Code Mate only acts as the window that launches those tools. For an individual who wants to move between several models, their own documents and agents in one window, the quickest check is to install this tool and start with one provider, one small knowledge base and one “Ask Before Acting” agent, and run it all the way through the recall test.